libcommbase is a collection of libraries to centralize common functions that can be shared across multiple conversational AI Powered assistant projects. It operates offline and can be implemented with AI (ML/DS) and programming languages.
controller
libcommbase comes with a number of possible reliable and mutually exclusive control messages that can be recorded and sent forward to get processed by skill applications. These control messages can also be changed or customized in its respective patterns file, and ultimately, increase or decrease in number preferably during your app designing phase. These out-of-the-box controls are:
Cancel previous actions
stop_previous_command
Repetitions
rerun_previous_command
reproduce_previuos_discourse
Start Reminder Countdowns
start_five_mins_question_reminder_countdown
start_ten_mins_question_reminder_countdown
start_twenty_mins_question_reminder_countdown
start_thirty_mins_question_reminder_countdown
remind_a_queued_question_put_on_hold
Decision-Making
accept_changes
deny_changes
confirm_a_confirmation_request
Select Options
select_option_number_one
select_option_number_two
select_option_number_three
select_option_number_four
Use Modes
request_the_current_mode
enter_the_computer_mode
enter_the_robot_mode
enter_the_car_mode
enter_the_boat_mode
enter_the_plane_mode
enter_the_starship_mode
enter_the_iron_man_mode
enter_the_refrigerator_mode
Use Submodes
enter_the_automatic_submode
enter_the_automated_submode
enter_the_autonomous_submode
Examples
Detailed information about examples can be found in the corresponding examples directory.
Contributors
Thanks to the following people who have contributed to this project:
BSD 3-Clause License

Copyright (c) 2007,2008 Spencer Janssen
Copyright (c) 2007,2008 Don Stewart
Copyright (c) The Xmonad Community. All rights reserved.
Copyright (c) 2023, Dætalys

Redistribution and use in source and binary forms, with or without
modification, are permitted provided that the following conditions are met:

1. Redistributions of source code must retain the above copyright notice, this
   list of conditions and the following disclaimer.

2. Redistributions in binary form must reproduce the above copyright notice,
   this list of conditions and the following disclaimer in the documentation
   and/or other materials provided with the distribution.

3. Neither the name of the copyright holder nor the names of its
   contributors may be used to endorse or promote products derived from
   this software without specific prior written permission.

THIS SOFTWARE IS PROVIDED BY THE COPYRIGHT HOLDERS AND CONTRIBUTORS "AS IS"
AND ANY EXPRESS OR IMPLIED WARRANTIES, INCLUDING, BUT NOT LIMITED TO, THE
IMPLIED WARRANTIES OF MERCHANTABILITY AND FITNESS FOR A PARTICULAR PURPOSE ARE
DISCLAIMED. IN NO EVENT SHALL THE COPYRIGHT HOLDER OR CONTRIBUTORS BE LIABLE
FOR ANY DIRECT, INDIRECT, INCIDENTAL, SPECIAL, EXEMPLARY, OR CONSEQUENTIAL
DAMAGES (INCLUDING, BUT NOT LIMITED TO, PROCUREMENT OF SUBSTITUTE GOODS OR
SERVICES; LOSS OF USE, DATA, OR PROFITS; OR BUSINESS INTERRUPTION) HOWEVER
CAUSED AND ON ANY THEORY OF LIABILITY, WHETHER IN CONTRACT, STRICT LIABILITY,
OR TORT (INCLUDING NEGLIGENCE OR OTHERWISE) ARISING IN ANY WAY OUT OF THE USE
OF THIS SOFTWARE, EVEN IF ADVISED OF THE POSSIBILITY OF SUCH DAMAGE.
Panning and zooming events for any target. May come handy for webgl, canvas, svg, images or pure html manipulations. Handles mobile pinch-zoom, drag and scroll interactions, provides inertial movement.
constpanzoom=require('pan-zoom');letunpanzoom=panzoom(document.body,e=>{// e contains all the params related to the interaction// pan deltase.dx;e.dy;// zoom deltae.dz;// coordinates of the centere.x;e.y;// type of interaction: mouse, touch, keyboarde.type;// target element event is applied toe.target;// original element event started frome.srcElement;// initial coordinates of interactione.x0;e.y0;});// call to remove panzoom handler from the targetunpanzoom()
The package is tested against Julia >= 1.6.0 on Linux, macOS, and Windows64.
Very early in the development cycle.
Julia implementations of integer triangles.
We give a framework for computing mathematical integer triangles and use
it to create so called “Integer Triangle Trait Cards”.
A trait card is a compilation of the essential characteristics of an integer triangle,
whereby we understand the characteristics of a triangle to be integer sequences that
can be obtained from the triangle by elementary transformations.
To see what you can expect start by executing
using IntegerTriangles
TraitCard(BinomialTriangle, 8)
Overview tables can be automatically generated for a variety of triangles and traits.
A-Number
Triangle
Form
Function
Sequence
A000302
Binomial
Std
PolyVal3
1, 4, 16, 64, 256, 1024, 4096, 16384
A001333
SchroederB
Inv
AltSum
1, -1, 3, -7, 17, -41, 99, -239
A006012
SchroederL
Inv
AltSum
1, -2, 6, -20, 68, -232, 792, -2704
A026302
Motzkin
Rev
Central
1, 2, 9, 44, 230, 1242, 6853, 38376
A103194
Laguerre
Std
TransNat0
0, 1, 6, 39, 292, 2505, 24306, 263431
nothing
Laguerre
Rev
TransNat1
1, 3, 15, 97, 753, 6771, 68983, 783945
Important: Note that we assume all sequences to start at offset = 0. Also note that all
references to A-numbers are approximativ only, i.e. the first few terms of the sequence
may differ and the OEIS-‘offset’ is always disregarded.
To use this feature you have to download the file stripped.gz from oeis.org, expand it and put it in the directory ../data.
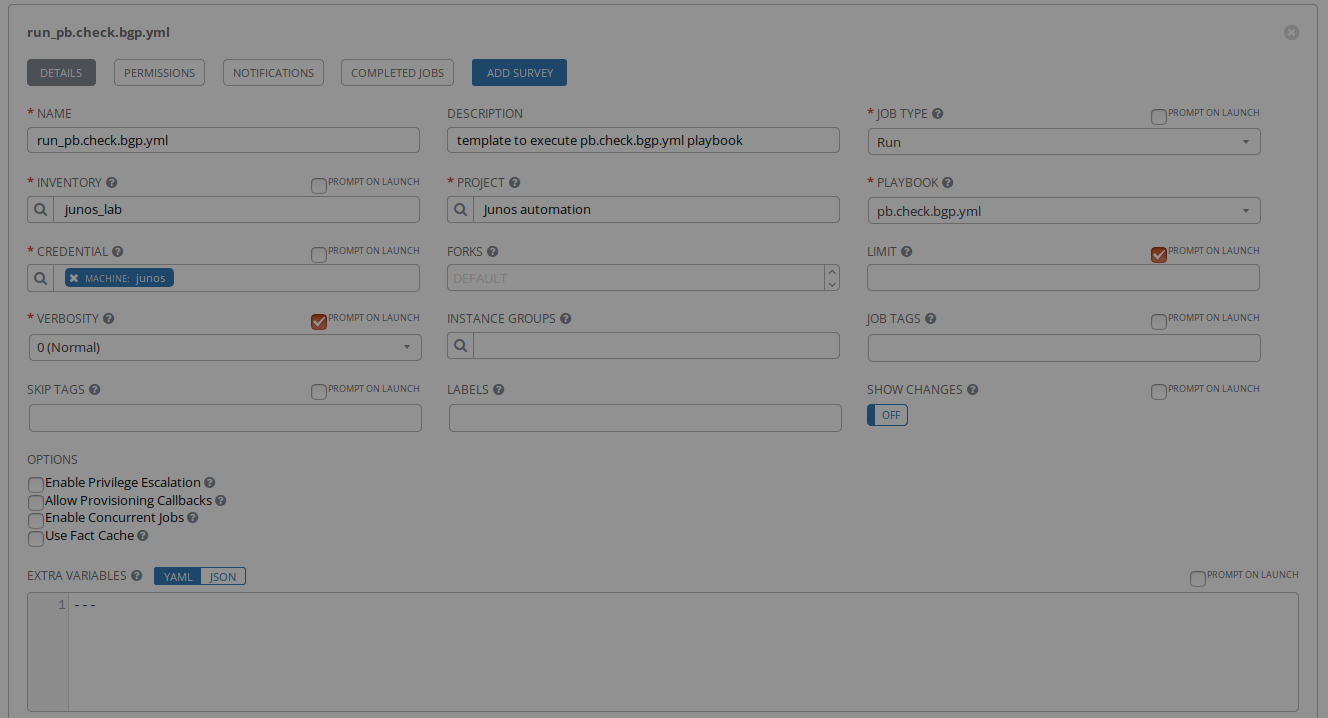
This repository provides the instructions to add the AWX requirements for Junos automation.
This repository doesn’t install AWX. You still need to install AWX yourself.
This repository has automation content to:
configure an existing AWX setup
If you want to consume Ansible content using AWX, you can use this repository to quickly add it to AWX.
to consume AWX
you can use this repository to execute playbooks with REST calls.
How to use this repo
The steps are:
Install AWX. This repository doesn’t install AWX. You still need to install AWX yourself.
Install the requirements to use Ansible modules for Junos
Add the Juniper.junos role from Galaxy to AWX
Install the requirements to use the python scripts hosted in this repository
Clone this repository
Edit the file variables.yml to indicate your details such as the ip address of your AWX, the git repository that has the playbooks you want to add yo your AWX, ….
You can now consume your playbooks with AWX GUI and AWX API!
AWX GUI is http://<awx_ip_address>
You can visit the AWX REST API with a web browser: http://<awx_ip_address>/api/v2/
Execute the file run_awx_template.py to consume your playbooks from AWX REST API.
AWX installation
This repository doesn’t install AWX. You still need to install AWX yourself.
Here’s the install guide
I am running AWX as a containerized application.
By default, AWX pulls the latest tag from docker hub.
Here’s how to use another tag. You need to do this before installing the AWX
$ nano awx/installer/inventory
$ more awx/installer/inventory | grep dockerhub_version
dockerhub_version=1.0.1
By default, AWX database is lost with reboots. You can change this behavior when you install AWX if you prefer AWX to keep its database after system restarts.
Issue the docker ps command to see what containers are running.
# docker ps
CONTAINER ID        IMAGE                     COMMAND                  CREATED             STATUS              PORTS                                NAMES
5f506acf7a9a        ansible/awx_task:latest   "/tini -- /bin/sh -c…"   2 weeks ago         Up About a minute   8052/tcp                             awx_task
89d2b50cd396        ansible/awx_web:latest    "/tini -- /bin/sh -c…"   2 weeks ago         Up About a minute   0.0.0.0:80->8052/tcp                 awx_web
6677b05c3dd8        memcached:alpine          "docker-entrypoint.s…"   2 weeks ago         Up About a minute   11211/tcp                            memcached
702d9538c538        rabbitmq:3                "docker-entrypoint.s…"   2 weeks ago         Up About a minute   4369/tcp, 5671-5672/tcp, 25672/tcp   rabbitmq
7167f4a3748e        postgres:9.6              "docker-entrypoint.s…"   2 weeks ago         Up About a minute   5432/tcp                             postgres
$ docker ps
CONTAINER ID        IMAGE               COMMAND             CREATED             STATUS              PORTS               NAMES
5f506acf7a9a ansible/awx_task:latest "/tini -- /bin/sh -c…" 2 weeks ago Up 1 second 8052/tcp awx_task
89d2b50cd396 ansible/awx_web:latest "/tini -- /bin/sh -c…" 2 weeks ago Up 1 second 0.0.0.0:80->8052/tcp awx_web
6677b05c3dd8 memcached:alpine "docker-entrypoint.s…" 2 weeks ago Up 3 seconds 11211/tcp memcached
702d9538c538 rabbitmq:3 "docker-entrypoint.s…" 2 weeks ago Up 2 seconds 4369/tcp, 5671-5672/tcp, 25672/tcp rabbitmq
7167f4a3748e postgres:9.6 "docker-entrypoint.s…" 2 weeks ago Up 2 seconds 5432/tcp postgres
The default AWX credentials are admin/password.
install the requirements to use Ansible modules for Junos
In addition to the ansible modules for Junos shipped with AWX, there is also another modules library you can use to interact with Junos.
These modules are available in the Juniper.junos role on galaxy
These modules are not shipped with Ansible.
These two sets of modules for Junos automation can coexist on the same Ansible control machine.
Run these commands from awx_task container to download and install the Juniper.junos role from galaxy
Connect to the container cli:
docker exec -it awx_task bash
Once connected awx_task container, run these commands:
# more ansible.cfg
[defaults]
roles_path = /etc/ansible/roles:./
install the requirements to use the automation content hosted in this repository
The python scripts hosted in this repository use the library requests to makes REST calls to AWX.
Run these commands on your laptop:
sudo -s
pip install requests
clone this repository
Run these commands on your laptop:
sudo -s
git clone https://github.com/ksator/junos-automation-with-AWX.git
cd junos-automation-with-AWX
Define your variables
The file variables.yml defines variables.
On your laptop, edit it to indicate details such as:
The IP address of your AWX
the git repository that has your playbooks
the list of playbooks from your git repository you want to add to AWX
the Junos devices credentials
and some additional details
Run these commands on your laptop:
vi variable.yml
$ more variables.yml
---
# awx ip @
awx:
ip: 192.168.233.142
# awx organization you want to create
organization:
name: "Juniper"
# awx team you want to create. The below team belongs to the above organization
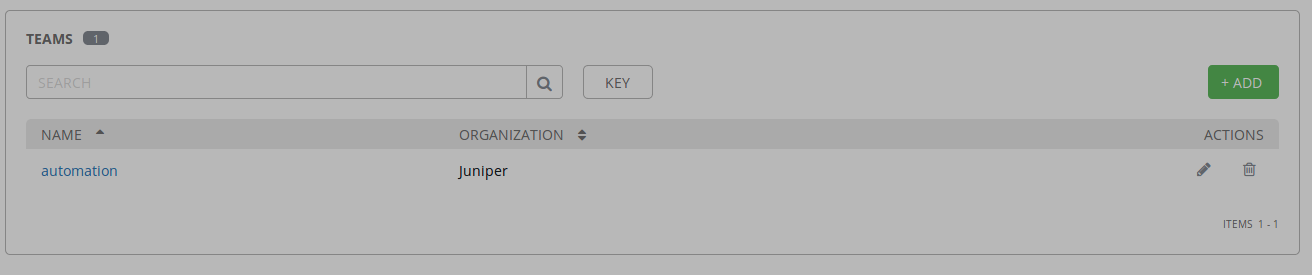
team:
name: "automation"
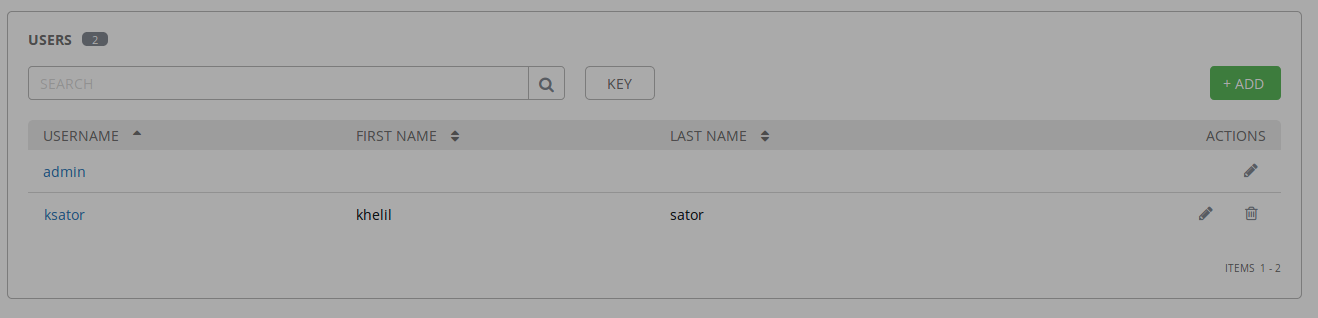
# awx user you want to create. The below user belongs to the above organization
user:
username: "ksator"
first_name: "khelil"
last_name: "sator"
password: "AWXpassword"
# awx project you want to create. The below project belongs to the above organization
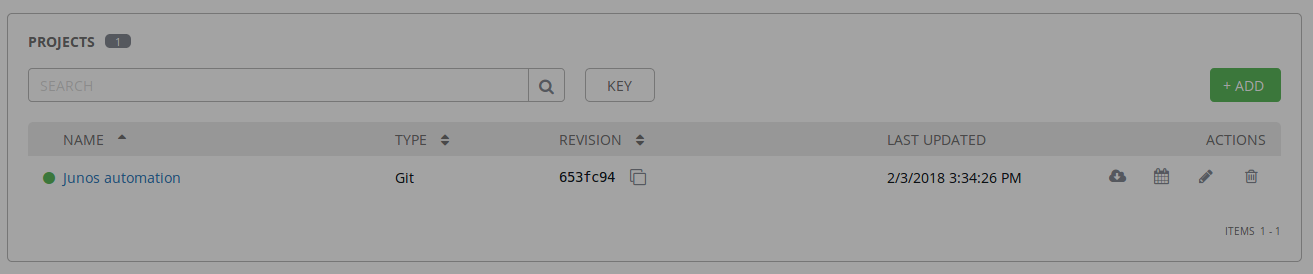
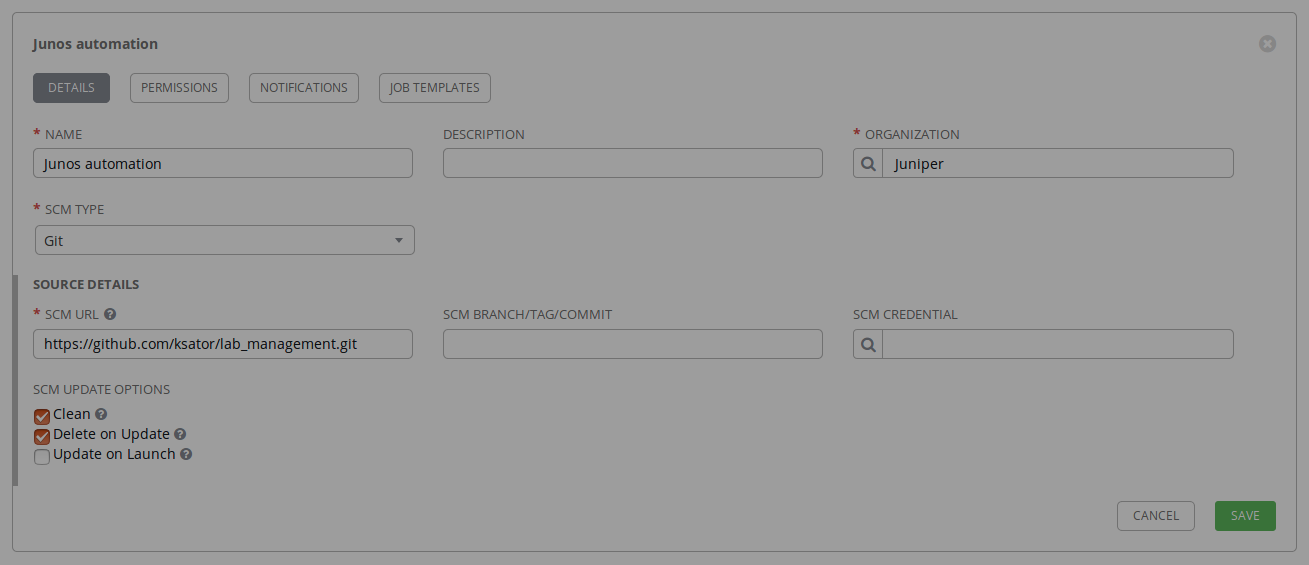
project:
name: "Junos automation"
git_url: "https://github.com/ksator/lab_management.git"
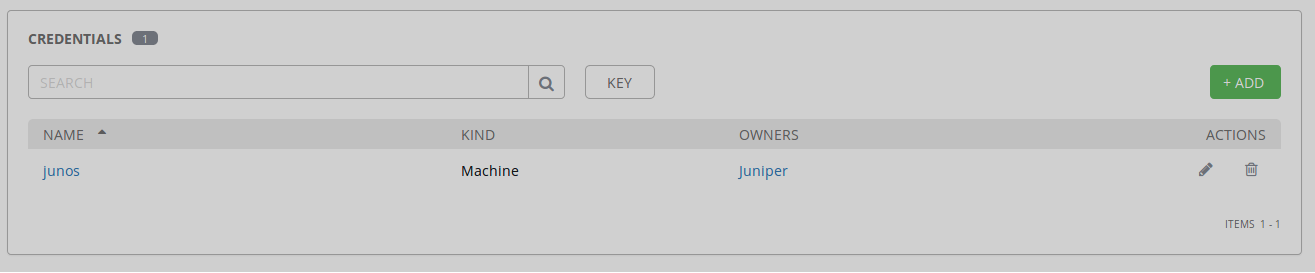
# credentials for AWX to connect to junos devices. The below credentials belong to the above organization
credentials:
name: "junos"
username: "lab"
password: "jnpr123"
# awx inventory you want to create.
# indicate which file you want to use as source of the AWX inventory.
# The below inventory belongs to the above organization
inventory:
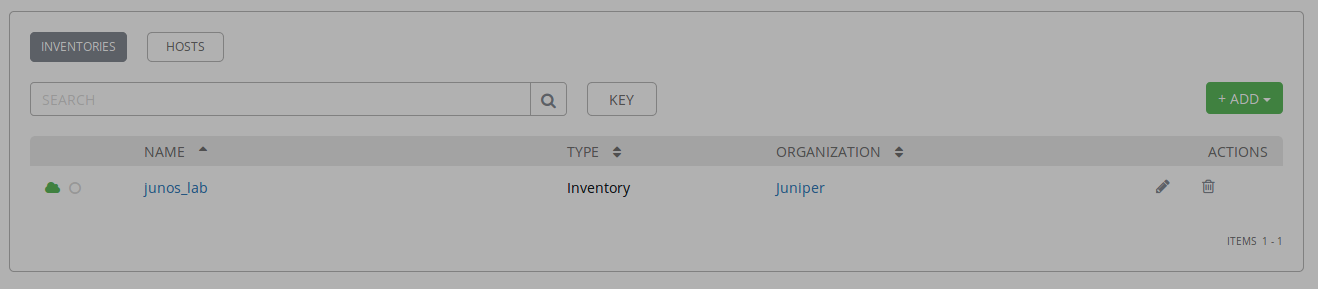
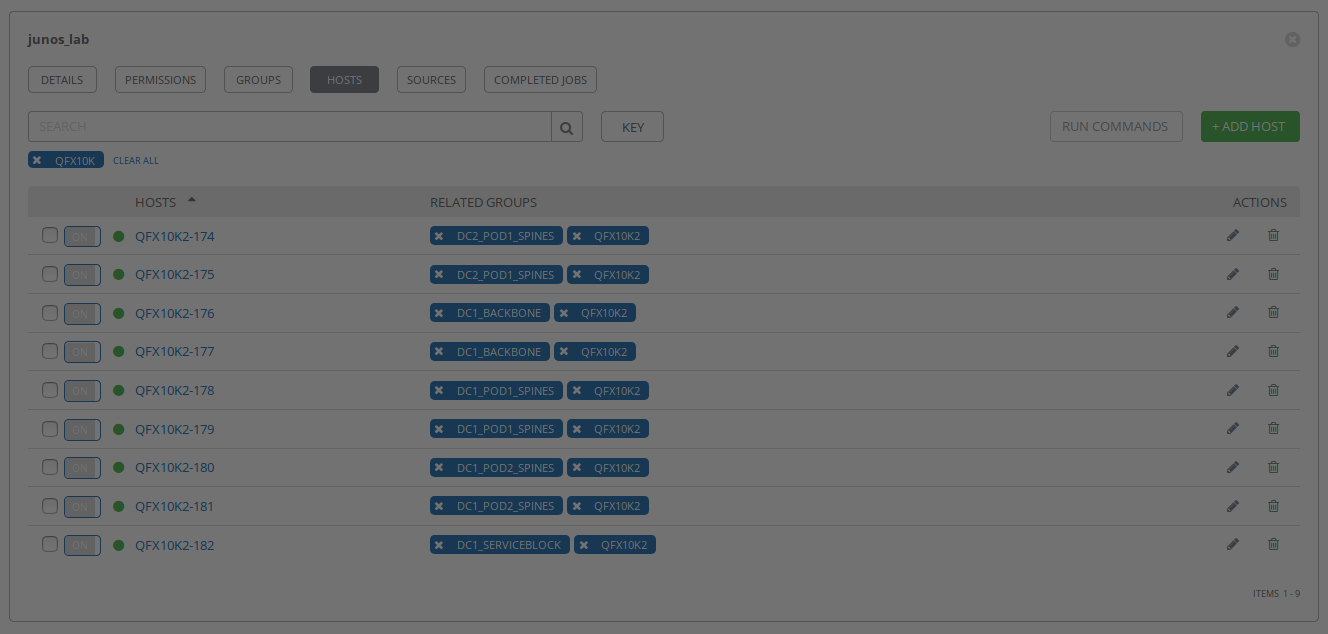
name: "junos_lab"
file: "hosts"
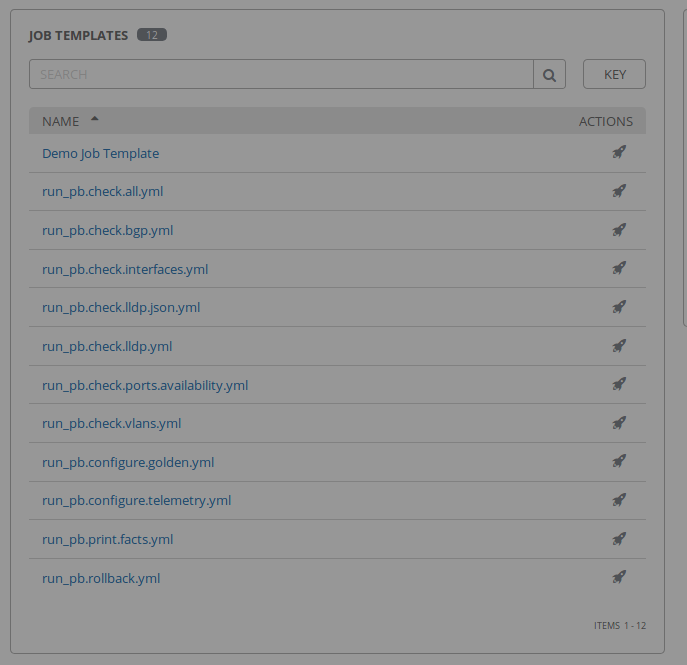
# awx templates you want to create.
# indicate the list of playbooks you want to use when creating equivalent awx templates.
# The below playbook belongs to the above source
playbooks:
- 'pb.check.lldp.yml'
- 'pb.check.bgp.yml'
- 'pb.check.interfaces.yml'
- 'pb.check.vlans.yml'
- 'pb.check.lldp.json.yml'
- 'pb.configure.golden.yml'
- 'pb.configure.telemetry.yml'
- 'pb.rollback.yml'
- 'pb.print.facts.yml'
- 'pb.check.all.yml'
- 'pb.check.ports.availability.yml'
An AWX team. The team belongs to the organization created above
An AWX user. The user belongs to the organization created above
Credentials for AWX to connect to junos devices. These credentials belong to the organization created above
An AWX project. The project belongs to the organization created above. The project uses playbooks from a git repository.
An AWX inventory. it belongs to the organization created above
An equivalent AWX template for each playbook from the git repository
Run this command on your laptop:
# python configure_awx.py
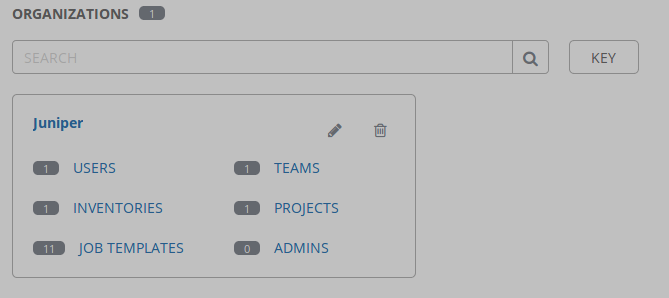
Juniper organization successfully created
automation team successfully created and added to the Juniper organization
ksator user successfully created and added to the Juniper organization
Junos automation project successfully created and added to the Juniper organization
junos credentials successfully created and added to the Juniper organization
junos_lab inventory successfully created and added to the Juniper organization
hosts file successfully added as a source to junos_lab inventory
wait 20 seconds before to resume
run_pb.check.lldp.yml template successfully created using the playbook pb.check.lldp.yml
run_pb.check.bgp.yml template successfully created using the playbook pb.check.bgp.yml
run_pb.check.interfaces.yml template successfully created using the playbook pb.check.interfaces.yml
run_pb.check.vlans.yml template successfully created using the playbook pb.check.vlans.yml
run_pb.check.lldp.json.yml template successfully created using the playbook pb.check.lldp.json.yml
run_pb.configure.golden.yml template successfully created using the playbook pb.configure.golden.yml
run_pb.configure.telemetry.yml template successfully created using the playbook pb.configure.telemetry.yml
run_pb.rollback.yml template successfully created using the playbook pb.rollback.yml
run_pb.print.facts.yml template successfully created using the playbook pb.print.facts.yml
run_pb.check.all.yml template successfully created using the playbook pb.check.all.yml
run_pb.check.ports.availability.yml template successfully created using the playbook pb.check.ports.availability.yml
The python script run_awx_templates.py makes REST calls to AWX to run an existing awx template.
Pass the template name as an argument.
Run this command on your laptop to consume an existing awx template:
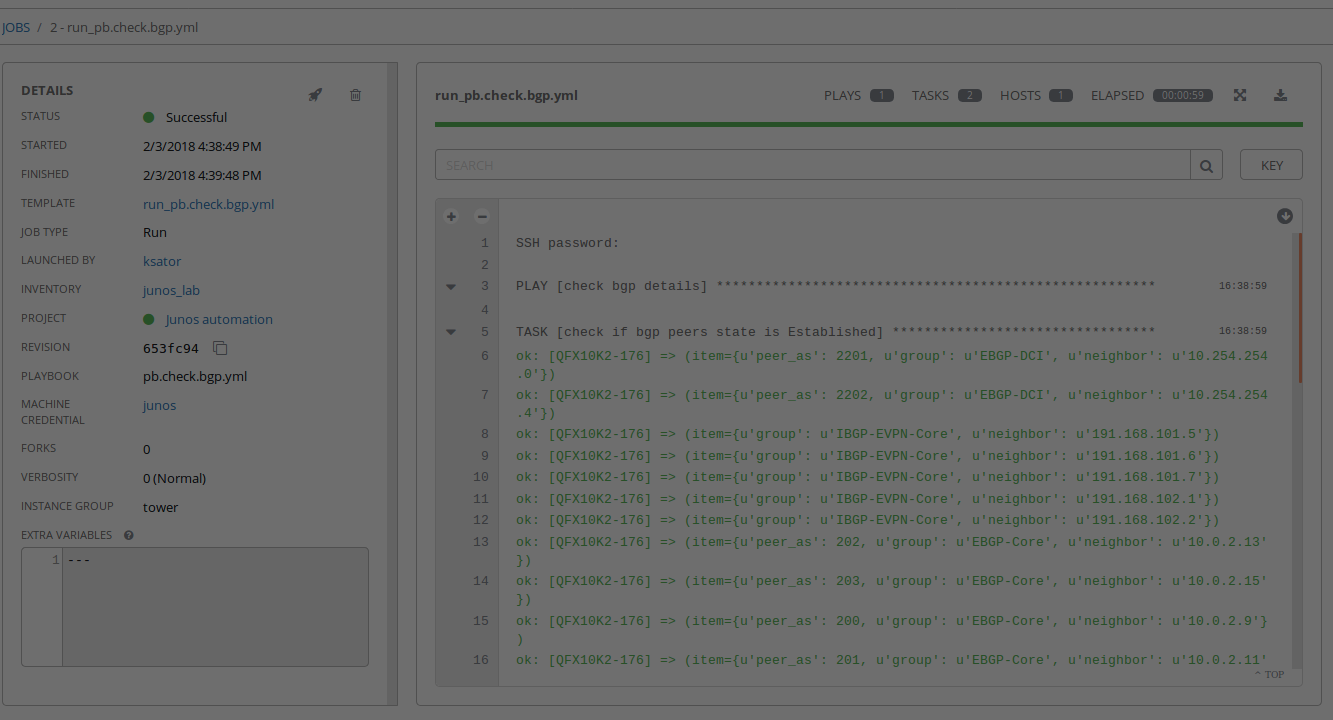
# python run_awx_template.py run_pb.check.bgp.yml
waiting for the job to complete ...
still waiting for the job to complete ...
still waiting for the job to complete ...
still waiting for the job to complete ...
status is successful
# python run_awx_template.py run_pb.check.lldp.yml
waiting for the job to complete ...
still waiting for the job to complete ...
still waiting for the job to complete ...
still waiting for the job to complete ...
still waiting for the job to complete ...
still waiting for the job to complete ...
status is successful
# python run_awx_templates.py non_existing_awx_template_name
there is a problem with that template
Verify with the GUI
Delete AWX templates with automation
Run this command on your laptop to delete all AWX templates:
# python delete_awx_templates.py
Note: By default, AWX database is lost with reboots. You can change this behavior when you install AWX if you prefer AWX to keep its database after system restarts.
# tower-cli config

# User options (set with `tower-cli config`; stored in ~/.tower_cli.cfg).
username: admin
password: password
host: http://localhost:80
verify_ssl: False

# Defaults.
use_token: False
verbose: False
certificate:
format: human
color: True
description_on: False
Use the CLI
# tower-cli credential list
== =============== ===============
id      name       credential_type
== =============== ===============
 1 Demo Credential               1
== =============== ===============
# tower-cli organization list
== =======
id  name
== =======
 1 Default
 2 Juniper
== =======
# tower-cli organization --help
Usage: tower-cli organization [OPTIONS] COMMAND [ARGS]...

  Manage organizations within Ansible Tower.

Options:
  --help  Show this message and exit.

Commands:
  associate           Associate a user with this organization.
  associate_admin     Associate an admin with this organization.
  associate_ig        Associate an ig with this organization.
  copy                Copy an organization.
  create              Create an organization.
  delete              Remove the given organization.
  disassociate        Disassociate a user with this organization.
  disassociate_admin  Disassociate an admin with this organization.
  disassociate_ig     Disassociate an ig with this organization.
  get                 Return one and exactly one organization.
  list                Return a list of organizations.
  modify              Modify an already existing organization.
# tower-cli organization delete --help
Usage: tower-cli organization delete [OPTIONS] [ID]

  Remove the given organization.

  If --fail-on-missing is True, then the organization's not being found is
  considered a failure; otherwise, a success with no change is reported.

Field Options:
  -n, --name TEXT         [REQUIRED] The name field.
  -d, --description TEXT  The description field.

Global Options:
  --use-token                     Turn on Tower's token-based authentication.
                                  Set config use_token to make this permanent.
  --certificate TEXT              Path to a custom certificate file that will
                                  be used throughout the command. Overwritten
                                  by --insecure flag if set.
  --insecure                      Turn off insecure connection warnings. Set
                                  config verify_ssl to make this permanent.
  --description-on                Show description in human-formatted output.
  -v, --verbose                   Show information about requests being made.
  -f, --format [human|json|yaml|id]
                                  Output format. The "human" format is
                                  intended for humans reading output on the
                                  CLI; the "json" and "yaml" formats provide
                                  more data, and "id" echos the object id
                                  only.
  -p, --tower-password TEXT       Password to use to authenticate to Ansible
                                  Tower. This will take precedence over a
                                  password provided to `tower config`, if any.
  -u, --tower-username TEXT       Username to use to authenticate to Ansible
                                  Tower. This will take precedence over a
                                  username provided to `tower config`, if any.
  -h, --tower-host TEXT           The location of the Ansible Tower host.
                                  HTTPS is assumed as the protocol unless
                                  "http://" is explicitly provided. This will
                                  take precedence over a host provided to
                                  `tower config`, if any.

Other Options:
  --help  Show this message and exit.
Continuous integration with Travis CI
There is a github webhook with Travis CI
The syntax of the python scripts in this repository is tested automatically by Travis CI.
The files .travis.yml at the root of this repository are used for this.
I created this simple web app because I recently got a puppy and constantly get asked how old he is… but never actually know the right answer. Using the playbooks in this repo, you can easily spin up a progressive web app that can be pinned to the home screen on your phone!
Hosting Support
Currently, hosting options are limited, but I hope to add more in the future. Feel free to fork or merge additional support for new platforms.
Confirm configuration succeeded aws configure list
Deploying the Site
Included in the repo are a few Ansible playbooks used to deploy the site to a specified host service. To take advantage of Ansible Automation, run one of the following commands:
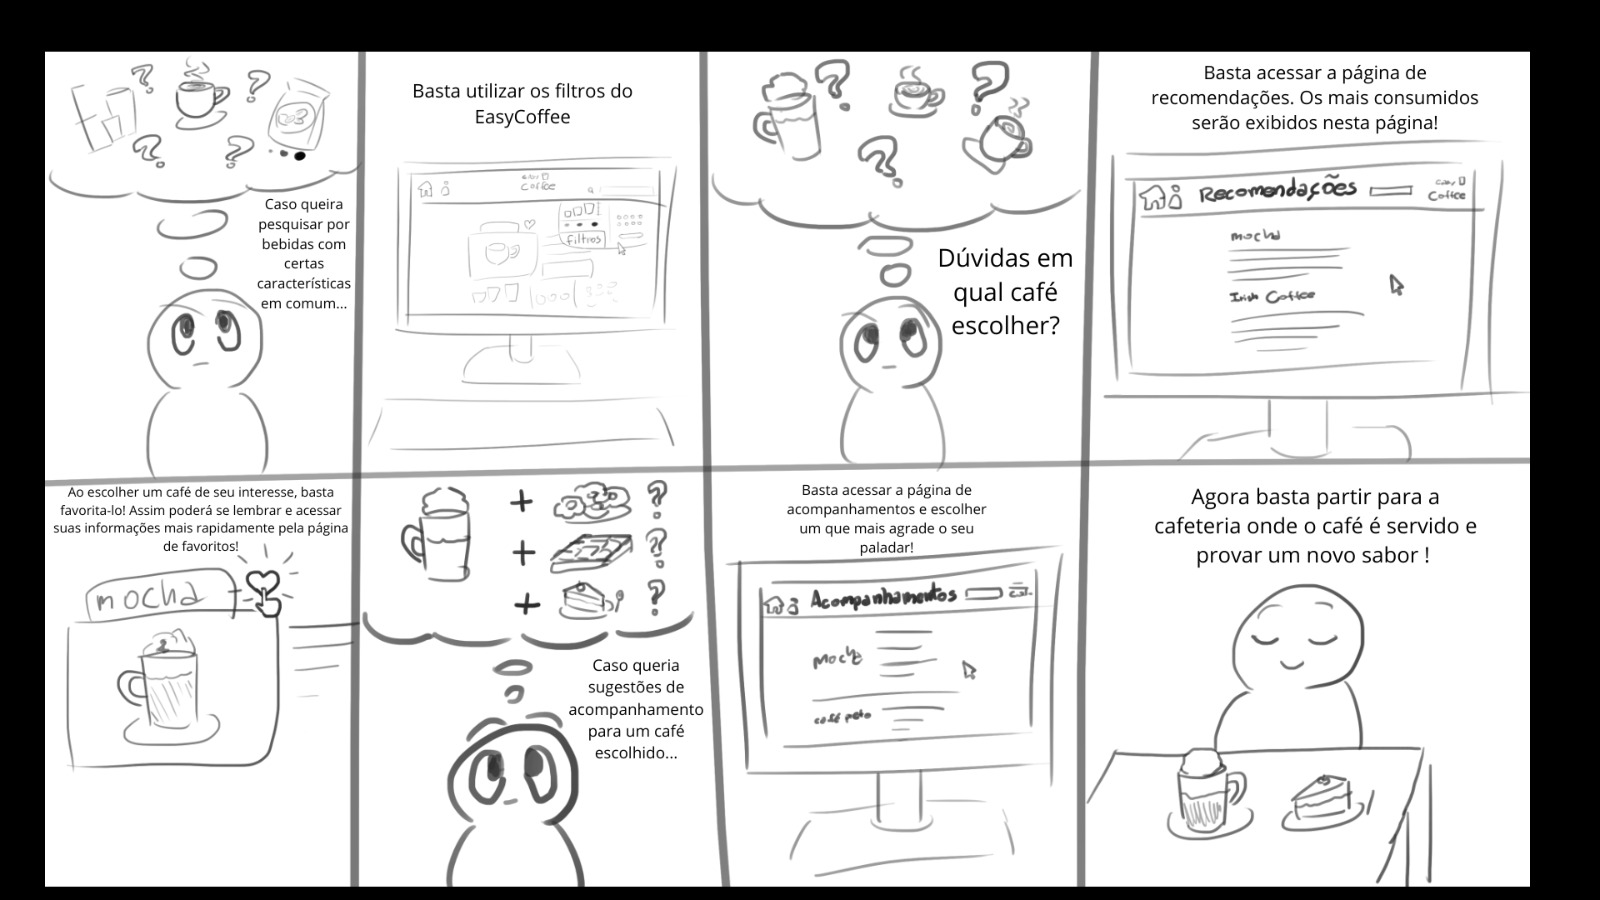
EasyCoffee é um website realizado utilizando o framework Django com o objetivo de expandir a cultura do café na região metropolitana do recife. Ele inclui um catálogo com cafés diversos, modos de preparo, grãos, glossarios, entre outras opções de aprender mais sobre a cultura do café.
Tecnologias Utilizadas
Linguagens de Programação: Python, JavaScript.
Linguagens de Marcação: HTML & CSS
Banco de Dados: SQLite3
Framework de Desenvolvimento: Django
Deployment: Microsoft Azure
Frontend: A interface do usuário é desenvolvida utilizando HTML, CSS com Bootstrap e JavaScript.
Organização: Utilizamos a plataforma Jira para organizar o projeto e azure para deixar o site ativo.


 https://github.com/mydroidandi/libcommbase