Category: Blog

  • torchprune

    torchprune

    Main contributors of this code base: Lucas Liebenwein, Cenk Baykal.

    Please check individual paper folders for authors of each paper.

    Papers

    This repository contains code to reproduce the results from the following papers:

    Paper Venue Title & Link
    Node NeurIPS 2021 Sparse Flows: Pruning Continuous-depth Models
    ALDS NeurIPS 2021 Compressing Neural Networks: Towards Determining the Optimal Layer-wise Decomposition
    Lost MLSys 2021 Lost in Pruning: The Effects of Pruning Neural Networks beyond Test Accuracy
    PFP ICLR 2020 Provable Filter Pruning for Efficient Neural Networks
    SiPP SIAM 2022 SiPPing Neural Networks: Sensitivity-informed Provable Pruning of Neural Networks

    Packages

    In addition, the repo also contains two stand-alone python packages that can be used for any desired pruning experiment:

    Packages Location Description
    torchprune ./src/torchprune This package can be used to run any of the implemented pruning algorithms. It also contains utilities to use pre-defined networks (or use your own network) and utilities for standard datasets.
    experiment ./src/experiment This package can be used to run pruning experiments and compare multiple pruning methods for different prune ratios. Each experiment is configured using a .yaml-configuration files.

    Paper Reproducibility

    The code for each paper is implemented in the respective packages. In addition, for each paper we have a separate folder that contains additional information about the paper and scripts and parameter configuration to reproduce the exact results from the paper.

    Paper Location
    Node paper/node
    ALDS paper/alds
    Lost paper/lost
    PFP paper/pfp
    SiPP paper/sipp

    Setup

    We provide three ways to install the codebase:

    1. Github repo + full conda environment
    2. Installation via pip
    3. Docker image

    1. Github Repo

    Clone the github repo:

    git pull git@github.com:lucaslie/torchprune.git
    # (or your favorite way to pull a repo)

    We recommend installing the packages in a separate conda environment. Then to create a new conda environment run

    conda create -n prune python=3.8 pip
    conda activate prune

    To install all required dependencies and both packages, run:

    pip install -r misc/requirements.txt

    Note that this will also install pre-commit hooks for clean commits 🙂

    2. Pip Installation

    To separately install each package with minimal dependencies without cloning the repo manually, run the following commands:

    # "torchprune" package
    pip install git+https://github.com/lucaslie/torchprune/#subdirectory=src/torchprune
    
    # "experiment" package
    pip install git+https://github.com/lucaslie/torchprune/#subdirectory=src/experiment

    Note that the experiment package does not automatically install the torchprune package.

    3. Docker Image

    You can simply pull the docker image from our docker hub:

    docker pull liebenwein/torchprune

    You can run it interactively with

    docker run -it liebenwein/torchprune bash

    For your reference you can find the Dockerfile here.

    More Information and Usage

    Check out the following READMEs in the sub-directories to find out more about using the codebase.

    READMEs More Information
    src/torchprune/README.md more details to prune neural networks, how to use and setup the data sets, how to implement custom pruning methods, and how to add your data sets and networks.
    src/experiment/README.md more details on how to configure and run your own experiments, and more information on how to re-produce the results.
    paper/node/README.md check out for more information on the Node paper.
    paper/alds/README.md check out for more information on the ALDS paper.
    paper/lost/README.md check out for more information on the Lost paper.
    paper/pfp/README.md check out for more information on the PFP paper.
    paper/sipp/README.md check out for more information on the SiPP paper.

    Citations

    Please cite the respective papers when using our work.

    @article{liebenwein2021sparse,
      title={Sparse flows: Pruning continuous-depth models},
      author={Liebenwein, Lucas and Hasani, Ramin and Amini, Alexander and Rus, Daniela},
      journal={Advances in Neural Information Processing Systems},
      volume={34},
      pages={22628--22642},
      year={2021}
    }
    
    @inproceedings{liebenwein2021alds,
     author = {Lucas Liebenwein and Alaa Maalouf and Dan Feldman and Daniela Rus},
     booktitle = {Advances in Neural Information Processing Systems},
     title = {Compressing Neural Networks: Towards Determining the Optimal Layer-wise Decomposition},
     url = {https://arxiv.org/abs/2107.11442},
     volume = {34},
     year = {2021}
    }
    
    @article{liebenwein2021lost,
    title={Lost in Pruning: The Effects of Pruning Neural Networks beyond Test Accuracy},
    author={Liebenwein, Lucas and Baykal, Cenk and Carter, Brandon and Gifford, David and Rus, Daniela},
    journal={Proceedings of Machine Learning and Systems},
    volume={3},
    year={2021}
    }
    
    @inproceedings{liebenwein2020provable,
    title={Provable Filter Pruning for Efficient Neural Networks},
    author={Lucas Liebenwein and Cenk Baykal and Harry Lang and Dan Feldman and Daniela Rus},
    booktitle={International Conference on Learning Representations},
    year={2020},
    url={https://openreview.net/forum?id=BJxkOlSYDH}
    }
    

    SiPPing Neural Networks (Weight Pruning)

    @article{baykal2022sensitivity,
      title={Sensitivity-informed provable pruning of neural networks},
      author={Baykal, Cenk and Liebenwein, Lucas and Gilitschenski, Igor and Feldman, Dan and Rus, Daniela},
      journal={SIAM Journal on Mathematics of Data Science},
      volume={4},
      number={1},
      pages={26--45},
      year={2022},
      publisher={SIAM}
    }
    
    Visit original content creator repository https://github.com/lucaslie/torchprune
  • conda

    CHEAT SHEET

    Conda

    COMANDO DESCRIPCIÓN
    conda info Verifica que Conda está instalado, comprueba el número de versión.
    conda update -n base conda Actualiza Conda a la versión actual.
    conda update anaconda Actualiza todos los paquetes a la última versión de Anaconda. Instalará versiones estables y compatibles, no necesariamente la más reciente.
    conda clean –all Elimina los archivos en caché no utilizados, incluyendo los paquetes no utilizados.
    conda config –show conda config –show-sources Examinar la configuración de Conda y los servicios de configuración.

    Creacion de entornos

    COMANDO DESCRIPCIÓN
    conda info –envs Listado de todos los entornos creados
    conda create –name ENVNAME python=3.6 “PKG1>7.6” PKG2 Crea un nuevo entorno llamado ENVNAME con la versión específica de Python y los paquetes instalados.
    conda create –name NEWENV –file pkgs.txt Crear un entorno basado en las versiones exactas de los paquetes.
    conda env create Crea un entorno a partir del archivo llamado environment.yml en el directorio actual.
    conda env create –file envname.yml Crear un entorno a partir de un archivo YAML.

    Activacion de entornos

    COMANDO DESCRIPCIÓN
    conda activate ENVNAME Activar un entorno Conda con nombre.
    conda activate /path/to/environment-dir Activar un entorno Conda en una ubicación concreta del disco.
    conda deactivate Desactivar el entorno actual.

    Eliminacion de entornos

    COMANDO DESCRIPCIÓN
    conda remove –name ENVNAME –all Eliminar un entorno completo.

    Configuracion de entornos

    COMANDO DESCRIPCIÓN
    conda env config vars set <name_var>=<value_var> Añade una variable de entorno al entorno activado
    conda env config vars unset <name_var> Elimina una variable de entorno del entorno activado
    conda env config vars list Lista las variables de entorno del entorno activado

    Compartir entornos

    COMANDO DESCRIPCIÓN
    create –clone ENVNAME –name NEWENV Hacer una copia exacta de un entorno conda.
    conda env export –name ENVNAME > envname.yml o conda env export > envname.yml Exporte un entorno a un archivo YAML que pueda ser leído en Windows, macOS y Linux.
    conda list [–explicit -e] > requirements.txt

    Administracion de entornos

    COMANDO DESCRIPCIÓN
    conda list –revisions Enumerar todas las revisiones realizadas en el entorno activo.
    conda list –name ENVNAME –revisions Enumerar todas las revisiones realizadas en un entorno determinado.
    conda install –name ENVNAME –revision REV_NUMBER Restaurar un entorno a una revisión anterior determinada.

    Packages

    COMANDO DESCRIPCIÓN
    conda list Enumerar todos los paquetes y versiones en el entorno activo.
    conda list –name ENVNAME Enumera todos los paquetes y versiones de un entorno determinado con la opcion –name.
    conda search PKGNAME=3.1 “PKGNAME [version=’>=3.1.0,<3.2′]” Buscar un paquete en los canales actualmente configurados con un rango de versiones >=3.1.0, <3.2″.
    anaconda search FUZZYNAME Encuentre un paquete en todos los canales utilizando el Cliente Anaconda.
    conda search PKGNAME –info Información detallada sobre las versiones de los paquetes.
    conda install conda-forge::PKGNAME Instalar el paquete desde un canal específico.
    conda install PKGNAME==3.1.4 Instalar un paquete por número de versión exacto (3.1.4).
    conda install “PKGNAME[version=’3.1.2 3.1.4′]”
    conda install “PKGNAME>2.5,<3.2” Instale las siguientes restricciones (AND).
    conda install –yes PKG1 PKG2 Ejecuta la mayoría de los comandos sin requerir un prompt de usuario. Útil para los scripts.
    conda uninstall PKGNAME –name ENVNAME Eliminar un paquete de un entorno.
    conda update –all –name ENVNAME Actualizar todos los paquetes de un entorno.

    Channels

    COMANDO DESCRIPCIÓN
    conda config –add channels CHANNELNAME Añade un canal a tu configuración de Conda.

    Referencias

    Visit original content creator repository
    https://github.com/igp7/conda

  • flask_ask_ros

    flask_ask_ros

    A locally hosted web service + ROS node for custom Alexa skills based on Flask-Ask.

    Table of Contents

    Description

    This package combines a Flask server and ROS node into a script that serves as an endpoint for a custom Alexa Skill. This enables information sent by voice to the Amazon Alexa to be processed by other ROS nodes and services.

    In this package we provide a simple Alexa skill that parses a single slot (word/argument) from an utterance (spoken function call) and publishes it to a ROS topic.

    Requirements

    • Ubuntu 16.04

    • ROS Kinetic

    • Flask-ask (Python): follow installation from source here.

    Maintainers

    Installation

    • Navigate to source directory of your ROS catkin workspace (e.g. catkin_ws):

          cd catkin_ws/src
          git clone https://github.com/3SpheresRoboticsProject/flask_ask_ros
    • Build catkin workspace:

          cd catkin_ws
          catkin_make
    • If necessary, set script file permissions to executable:

          chmod +x catkin_ws/src/flask_ask_ros/src/*
    • Source workspace:

          source catkin_ws/devel/setup.bash

    Usage

    Endpoint configuration

    In order for the Alexa requests to reach the local skill server, the local network must be configured to tunnel HTTPS traffic to a specific port on the local machine.

    We have tested two ways to accomplish this:

    • Using ngrok as a tunnel

    • Static IP/Dynamic DNS + self-signed SSL certificate

    ngrok tunnel configuration

    1. Set the ROS_IP environment variable to be the local machine IP

    2. Download ngrok for Linux and unzip

    3. Start an ngrok server:

      ./ngrok http $ROS_IP:5000
    4. Open the Amazon Developer Console and navigate to your custom skill:

      • Under Configuration, select HTTPS and paste the URL shown on the ngrok terminal (see below).

        alt text

      • Under SSL Certificate select My development endpoint is a sub-domain of a domain that has a wildcard certificate from a certificate authority.

    5. Run the skill server with the ngrok argument set to true:

      roslaunch flask_ask_ros start_skill_server.launch ngrok:=true

    Static IP/Dynamic DNS + self-signed SSL certificate

    1. Set the ROS_IP environment variable to be the local machine IP

    2. Configure the router to forward HTTPS requests (port 443) from the local network’s public IP to a local IP and port 5000

      This setting is usually located under ‘Virtual Server’, or ‘Port triggering’. See an example below on the D-Link DIR-655 router.

      alt_text

    3. Include the static IP and/or Dynamic DNS hostname in a SSL configuration file /config/ssl_keys/configuration.cnf (sample provided)

      Under [subject_alternate_names] add the line IP.1 = <your ip> and/or DNS.1 = <your hostname>

    4. Run the script generate_ssl_cert.sh to generate the certificate in /config/ssl_keys/certificate.pem

    5. Open the Amazon Developer Console and navigate to your custom skill:

      • Under Configuration, select HTTPS and type in https://<your hostname> or https://<your ip>

      • Under SSL Certificate, select I will upload a self-signed certificate… and paste the contents of /config/ssl_keys/certificate.pem

    6. Run the skill server

      roslaunch flask_ask_ros start_skill_server.launch

    Testing

    In order to test the provided skill server, open your Amazon Developer Console, create a custom skill, and follow the steps above to configure your endpoint.

    Inside the skill builder, navigate to the JSON Editor and paste the contents of src/test_skill.json. Save and build the model.

    Run the skill server to test your skill.

    TODO

    • Sample code for ROS services

    This app was not created or endorsed by Amazon.

    Visit original content creator repository https://github.com/3SpheresRoboticsProject/flask_ask_ros
  • BottomSheet

    BottomSheet

    SwiftPM compatible GitHub version CocoaPods compatible CocoaPods version License Issues

    A sliding sheet from the bottom of the screen with custom states build with SwiftUI.

    Version 3 is out now!

    Please look here and read the README for more information on the changes.

    Why

    There have been many different attempts to recreate the BottomSheet from Apple Maps, Shortcuts and Apple Music, because Apple unfortunately does not provide it in their SDK. (Update: It was more or less added in iOS 16)

    However, most previous attempts share a common problem: The height does not change in the different states. Thus, the BottomSheet is always the same size (e.g. 800px) and thus remains 800px, even if you only see e.g. 400px – the rest is inaccessible unless you pull the BottomSheet up to the very top.

    There are also many implementations out there that only have 2 statesnot 3 like e.g. Apple Maps.

    Features

    • Very easy to use
    • Build in header/title (see Parameters)
    • Many view modifiers for customisation (see Modifiers)
    • Fully customisable States (any number of states at any height) (see BottomSheetPosition)
    • States can have the height of their content, absolute pixel values or percentages of the screen height (see BottomSheetPosition)
    • Support for SearchBar in the header
    • It works with ScrollView, List and every other view
    • Can hide the content when in ...Bottom position like Apple does
    • Imbedded .appleScrollBehaviour() modifier, to replicate Apple’s ScrollView behaviour
    • Completely animated
    • And much more…

    Requirements

    • iOS 13, macCatalyst 13, macOS 10.15
    • Swift 5.5
    • Xcode 12

    Installation

    Swift Package Manager

    The preferred way of installing BottomSheet is via the Swift Package Manager.

    Xcode 11 integrates with libSwiftPM to provide support for iOS, watchOS, and tvOS platforms.

    1. In Xcode, open your project and navigate to FileAdd Packages
    2. Paste the repository URL (https://github.com/lucaszischka/BottomSheet) and click Next.
    3. For Rules, select Up to Next Major Version.
    4. Click Add Package.

    CocoaPods

    BottomSheet is available through CocoaPods. To install it, simply add the following line to your Podfile:

    pod 'BottomSheetSwiftUI'

    Now run pod install in the Terminal to install this dependency.

    Usage

    WARNING: This is Sample Code for visualisation where and how to use, without a working initializer. Please see Examples for working code.

    BottomSheet is similar to the built-in Sheet:

    struct ContentView: View {
    
        @State var bottomSheetPosition: BottomSheetPosition = .middle //1
        
        var body: some View {
        
            Map() //2
                .bottomSheet() //3
        }
    }

    //1 The current State of the BottomSheet.

    • For more information about the possible positions see BottomSheetPosition.
    • If you don’t want the BottomSheet to be drag-able and the state to be switchable, you can use the .isResizable(false) modifier.

    //2 The view which the BottomSheet overlays.

    • Important: If you want to overlay a TabBar or a NavigationView, you need to add the BottomSheet on a higher level.

    //3 This is how you add the BottomSheet – easy right?

    Parameters

    Title as Header Content

    .bottomSheet(
        bottomSheetPosition: Binding<BottomSheetPosition>,
        switchablePositions: [BottomSheetPosition],
        title: String?,
        content: () -> MContent
    )

    bottomSheetPosition: A binding that holds the current position/state of the BottomSheet.

    • If you don’t want the BottomSheet to be drag-able and the state to be switchable, you can use the .isResizable(false) modifier.
    • For more information about the possible positions see BottomSheetPosition.

    switchablePositions: An array that contains the positions/states of the BottomSheet.

    • Only the positions/states contained in the array can be switched into (via tapping the drag indicator or swiping the BottomSheet).
    • For more information about the possible positions see BottomSheetPosition.

    title: A String that is displayed as title.

    • You can use a view that is used as header content instead.

    content: A view that is used as main content for the BottomSheet.

    Custom Header Content

    .bottomSheet(
        bottomSheetPosition: Binding<BottomSheetPosition>,
        switchablePositions: [BottomSheetPosition],
        headerContent: () -> HContent?,
        mainContent: () -> MContent
    )

    bottomSheetPosition: A binding that holds the current position/state of the BottomSheet.

    • If you don’t want the BottomSheet to be drag-able and the state to be switchable, you can use the .isResizable(false) modifier.
    • For more information about the possible positions see BottomSheetPosition.

    switchablePositions: An array that contains the positions/states of the BottomSheet.

    • Only the positions/states contained in the array can be switched into (via tapping the drag indicator or swiping the BottomSheet).
    • For more information about the possible positions see BottomSheetPosition.

    headerContent: A view that is used as header content for the BottomSheet.

    • You can use a String that is displayed as title instead.

    mainContent: A view that is used as main content for the BottomSheet.

    Modifiers

    The ViewModifiers are used to customise the look and feel of the BottomSheet.

    .enableAccountingForKeyboardHeight(Bool): Adds padding to the bottom of the main content when the keyboard appears so all of the main content is visible.

    • If the height of the sheet is smaller than the height of the keyboard, this modifier will not make the content visible.
    • This modifier is not available on Mac, because it would not make sense there.

    .enableAppleScrollBehavior(Bool): Packs the mainContent into a ScrollView.

    • Behaviour on the iPhone:
      • The ScrollView is only enabled (scrollable) when the BottomSheet is in a ...Top position.
      • If the offset of the ScrollView becomes less than or equal to 0, the BottomSheet is pulled down instead of scrolling.
      • In every other position the BottomSheet will be dragged instead
    • This behaviour is not active on Mac and iPad, because it would not make sense there.
    • Please note, that this feature has sometimes weird flickering, when the content of the ScrollView is smaller than itself. If you have experience with UIKit and UIScrollViews, you are welcome to open a pull request to fix this.

    .enableBackgroundBlur(Bool): Adds a fullscreen blur layer below the BottomSheet.

    • The opacity of the layer is proportional to the height of the BottomSheet.
    • The material can be changed using the .backgroundBlurMaterial() modifier.

    .backgroundBlurMaterial(VisualEffect): Changes the material of the blur layer.

    • Changing the material does not affect whether the blur layer is shown.
    • To toggle the blur layer please use the .enableBackgroundBlur() modifier.

    .showCloseButton(Bool): Adds a close button to the headerContent on the trailing side.

    • To perform a custom action when the BottomSheet is closed (not only via the close button), please use the .onDismiss() option.

    .enableContentDrag(Bool): Makes it possible to resize the BottomSheet by dragging the mainContent.

    • Due to imitations in the SwiftUI framework, this option has no effect or even makes the BottomSheet glitch if the mainContent is packed into a ScrollView or a List.

    .customAnimation(Animation?): Applies the given animation to the BottomSheet when any value changes.

    .customBackground(...): Changes the background of the BottomSheet.

    • This works exactly like the native SwiftUI .background(...) modifier.
    • Using offset or shadow may break the hiding transition.

    .onDragChanged((DragGesture.Value) -> Void): Adds an action to perform when the gesture’s value changes.

    .onDragEnded((DragGesture.Value)): Adds an action to perform when the gesture ends.

    .dragPositionSwitchAction((GeometryProxy, DragGesture.Value) -> Void): Replaces the action that will be performed when the user drags the sheet down.

    • The GeometryProxy and DragGesture.Value parameter can be used for calculations.
    • You need to switch the positions, account for the reversed drag direction on iPad and Mac and dismiss the keyboard yourself.
    • Also the swipeToDismiss and flickThrough features are triggered via this method. By replacing it, you will need to handle both yourself.
    • The GeometryProxy‘s height contains the bottom safe area inserts on iPhone.
    • The GeometryProxy‘s height contains the top safe area inserts on iPad and Mac.

    .showDragIndicator(Bool): Adds a drag indicator to the BottomSheet.

    • On iPhone it is centered above the headerContent.
    • On Mac and iPad it is centered above the mainContent,
    • To change the color of the drag indicator please use the .dragIndicatorColor() modifier.

    .dragIndicatorColor(Color): Changes the color of the drag indicator.

    • Changing the color does not affect whether the drag indicator is shown.
    • To toggle the drag indicator please use the .showDragIndicator() modifier.

    .dragIndicatorAction((GeometryProxy) -> Void): Replaces the action that will be performed when the drag indicator is tapped.

    • The GeometryProxy parameter can be used for calculations.
    • You need to switch the positions and dismiss the keyboard yourself.
    • The GeometryProxy‘s height contains the bottom safe area inserts on iPhone.
    • The GeometryProxy‘s height contains the top safe area inserts on iPad and Mac.

    .enableFlickThrough(Bool): Makes it possible to switch directly to the top or bottom position by long swiping.

    .enableFloatingIPadSheet(Bool): Makes it possible to make the sheet appear like on iPhone.

    .onDismiss(() -> Void): A action that will be performed when the BottomSheet is dismissed.

    • Please note that when you dismiss the BottomSheet yourself, by setting the bottomSheetPosition to .hidden, the action will not be called.

    .isResizable(Bool): Makes it possible to resize the BottomSheet.

    • When disabled the drag indicator disappears.

    .sheetWidth(BottomSheetWidth): Makes it possible to configure a custom sheet width.

    • Can be relative through BottomSheetWidth.relative(x).
    • Can be absolute through BottomSheetWidth.absolute(x).
    • Set to BottomSheetWidth.platformDefault to let the library decide the width.

    .enableSwipeToDismiss(Bool): Makes it possible to dismiss the BottomSheet by long swiping.

    .enableTapToDismiss(Bool): Makes it possible to dismiss the BottomSheet by tapping somewhere else.

    .customThreshold(Double): Sets a custom threshold which determines, when to trigger swipe to dismiss or flick through.

    • The threshold must be positive and higher than 10% (0.1).
    • Changing the threshold does not affect whether either option is enabled.
    • The default threshold is 30% (0.3).

    BottomSheetPosition

    The BottomSheetPosition enum holds all states you can switch into. There are 3 mayor types:

    • .dynamic..., where the height of the BottomSheet is equal to its content height
    • .relative..., where the height of the BottomSheet is a percentage of the screen height
    • .absolute..., where the height of the BottomSheet is a pixel value

    You can combine those types as much as you want. You can also use multiple instances of one case (for example .relative(0.4) and .relative(0.6)).

    The positions/states in detail:

    /// The state where the BottomSheet is hidden.
    case hidden
    
    /// The state where only the headerContent is visible.
    case dynamicBottom
    
    /// The state where the height of the BottomSheet is equal to its content size.
    /// Only makes sense for views that don't take all available space (like ScrollVIew, Color, ...).
    case dynamic
    
    /// The state where the height of the BottomSheet is equal to its content size.
    /// It functions as top position for appleScrollBehaviour,
    /// although it doesn't make much sense to use it with dynamic.
    /// Only makes sense for views that don't take all available space (like ScrollVIew, Color, ...).
    case dynamicTop
    
    /// The state where only the headerContent is visible.
    /// The height of the BottomSheet is x%.
    /// Only values between 0 and 1 make sense.
    /// Instead of 0 please use `.hidden`.
    case relativeBottom(CGFloat)
    
    /// The state where the height of the BottomSheet is equal to x%.
    /// Only values between 0 and 1 make sense.
    /// Instead of 0 please use `.hidden`.
    case relative(CGFloat)
    
    /// The state where the height of the BottomSheet is equal to x%.
    /// It functions as top position for appleScrollBehaviour.
    /// Only values between 0 and 1 make sense.
    /// Instead of 0 please use `.hidden`.
    case relativeTop(CGFloat)
    
    /// The state where only the headerContent is visible
    /// The height of the BottomSheet is x.
    /// Only values above 0 make sense.
    /// Instead of 0 please use `.hidden`.
    case absoluteBottom(CGFloat)
    
    /// The state where the height of the BottomSheet is equal to x.
    /// Only values above 0 make sense.
    /// Instead of 0 please use `.hidden`.
    case absolute(CGFloat)
    
    /// The state where the height of the BottomSheet is equal to x.
    /// It functions as top position for appleScrollBehaviour.
    /// Only values above 0 make sense.
    /// Instead of 0 please use `.hidden`.
    case absoluteTop(CGFloat)

    Examples

    PLEASE NOTE: When installed via Cocoapods, please keep in mind that the pod is called BottomSheetSwiftUI and not BottomSheet; so please use import BottomSheetSwiftUI instead.

    Book Detail View

    This BottomSheet shows additional information about a book. You can close it by swiping it away, by tapping on the background or the close button. The drag indicator is hidden. The content can be used for resizing the sheet.

    Source Code
    import SwiftUI
    import BottomSheet
    
    struct BookDetailView: View {
        @State var bottomSheetPosition: BottomSheetPosition = .absolute(325)
        
        let backgroundColors: [Color] = [Color(red: 0.2, green: 0.85, blue: 0.7), Color(red: 0.13, green: 0.55, blue: 0.45)]
        let readMoreColors: [Color] = [Color(red: 0.70, green: 0.22, blue: 0.22), Color(red: 1, green: 0.32, blue: 0.32)]
        let bookmarkColors: [Color] = [Color(red: 0.28, green: 0.28, blue: 0.53), Color(red: 0.44, green: 0.44, blue: 0.83)]
        
        var body: some View {
            //A green gradient as a background that ignores the safe area.
            LinearGradient(gradient: Gradient(colors: self.backgroundColors), startPoint: .topLeading, endPoint: .bottomTrailing)
                .edgesIgnoringSafeArea(.all)
            
                .bottomSheet(bottomSheetPosition: self.$bottomSheetPosition, switchablePositions: [
                    .dynamicBottom,
                    .absolute(325)
                ], headerContent: {
                    //The name of the book as the heading and the author as the subtitle with a divider.
                    VStack(alignment: .leading) {
                        Text("Wuthering Heights")
                            .font(.title).bold()
                        
                        Text("by Emily Brontë")
                            .font(.subheadline).foregroundColor(.secondary)
                        
                        Divider()
                            .padding(.trailing, -30)
                    }
                    .padding([.top, .leading])
                }) {
                    //A short introduction to the book, with a "Read More" button and a "Bookmark" button.
                    VStack(spacing: 0) {
                        Text("This tumultuous tale of life in a bleak farmhouse on the Yorkshire moors is a popular set text for GCSE and A-level English study, but away from the demands of the classroom it’s easier to enjoy its drama and intensity. Populated largely by characters whose inability to control their own emotions...")
                            .fixedSize(horizontal: false, vertical: true)
                        
                        HStack {
                            Button(action: {}, label: {
                                Text("Read More")
                                    .padding(.horizontal)
                            })
                                .buttonStyle(BookButton(colors: self.readMoreColors)).clipShape(Capsule())
                            
                            Spacer()
                            
                            Button(action: {}, label: {
                                Image(systemName: "bookmark")
                            })
                                .buttonStyle(BookButton(colors: self.bookmarkColors)).clipShape(Circle())
                        }
                        .padding(.top)
                        
                        Spacer(minLength: 0)
                    }
                    .padding([.horizontal, .top])
                }
                .showDragIndicator(false)
                .enableContentDrag()
                .showCloseButton()
                .enableSwipeToDismiss()
                .enableTapToDismiss()
        }
    }
    
    //The gradient ButtonStyle.
    struct BookButton: ButtonStyle {
        
        let colors: [Color]
        
        func makeBody(configuration: Configuration) -> some View {
            configuration.label
                .font(.headline)
                .foregroundColor(.white)
                .padding()
                .background(LinearGradient(gradient: Gradient(colors: self.colors), startPoint: .topLeading, endPoint: .bottomTrailing))
        }
    }

    Word Search View

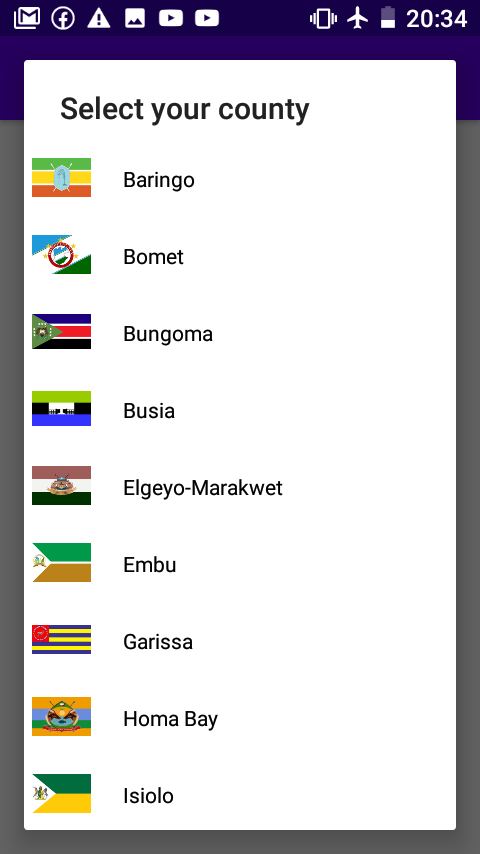
    This BottomSheet shows nouns which can be filtered by searching. It adapts the scrolling behaviour of apple, so that you can only scroll the ScrollView in the .top position (else the BottomSheet gets dragged); on iPad and Mac this behaviour is not present and a normal ScrollView is used. The higher the BottomSheet is dragged, the more blurry the background becomes (with the BlurEffect .systemDark) to move the focus to the BottomSheet.

    Source Code
    import SwiftUI
    import BottomSheet
    
    struct WordSearchView: View {
        
        @State var bottomSheetPosition: BottomSheetPosition = .relative(0.4)
        @State var searchText: String = ""
        
        let backgroundColors: [Color] = [Color(red: 0.28, green: 0.28, blue: 0.53), Color(red: 1, green: 0.69, blue: 0.26)]
        let words: [String] = ["birthday", "pancake", "expansion", "brick", "bushes", "coal", "calendar", "home", "pig", "bath", "reading", "cellar", "knot", "year", "ink"]
        
        var filteredWords: [String] {
            self.words.filter({ $0.contains(self.searchText.lowercased()) || self.searchText.isEmpty })
        }
        
        
        var body: some View {
            //A green gradient as a background that ignores the safe area.
            LinearGradient(gradient: Gradient(colors: self.backgroundColors), startPoint: .topLeading, endPoint: .bottomTrailing)
                .edgesIgnoringSafeArea(.all)
            
                .bottomSheet(bottomSheetPosition: self.$bottomSheetPosition, switchablePositions: [
                    .relativeBottom(0.125),
                    .relative(0.4),
                    .relativeTop(0.975)
                ], headerContent: {
                    //A SearchBar as headerContent.
                    HStack {
                        Image(systemName: "magnifyingglass")
                        TextField("Search", text: self.$searchText)
                    }
                    .foregroundColor(Color(UIColor.secondaryLabel))
                    .padding(.vertical, 8)
                    .padding(.horizontal, 5)
                    .background(RoundedRectangle(cornerRadius: 10).fill(Color(UIColor.quaternaryLabel)))
                    .padding([.horizontal, .bottom])
                    //When you tap the SearchBar, the BottomSheet moves to the .top position to make room for the keyboard.
                    .onTapGesture {
                        self.bottomSheetPosition = .relativeTop(0.975)
                    }
                }) {
                    //The list of nouns that will be filtered by the searchText.
                    ForEach(self.filteredWords, id: \.self) { word in
                        Text(word)
                            .font(.title)
                            .padding([.leading, .bottom])
                            .frame(maxWidth: .infinity, alignment: .leading)
                    }
                    .frame(maxWidth: .infinity, alignment: .leading)
                    .transition(.opacity)
                    .animation(.easeInOut, value: self.filteredWords)
                    .padding(.top)
                }
                .enableAppleScrollBehavior()
                .enableBackgroundBlur()
                .backgroundBlurMaterial(.systemDark)
        }
    }

    Artist Songs View

    This BottomSheet shows the most popular songs by an artist. It has a custom animation and color for the drag indicator and the background, as well as it deactivates the bottom position behaviour and uses a custom corner radius and shadow.

    Source Code
    import SwiftUI
    import BottomSheet
    
    struct ArtistSongsView: View {
        
        @State var bottomSheetPosition: BottomSheetPosition = .relative(0.4)
        
        let backgroundColors: [Color] = [Color(red: 0.17, green: 0.17, blue: 0.33), Color(red: 0.80, green: 0.38, blue: 0.2)]
        let songs: [String] = ["One Dance (feat. Wizkid & Kyla)", "God's Plan", "SICKO MODE", "In My Feelings", "Work (feat. Drake)", "Nice For What", "Hotline Bling", "Too Good (feat. Rihanna)", "Life Is Good (feat. Drake)"]
        
        var body: some View {
            //A green gradient as a background that ignores the safe area.
            LinearGradient(gradient: Gradient(colors: self.backgroundColors), startPoint: .topLeading, endPoint: .bottomTrailing)
                .edgesIgnoringSafeArea(.all)
            
                .bottomSheet(bottomSheetPosition: self.$bottomSheetPosition, switchablePositions: [
                    .relative(0.125),
                    .relative(0.4),
                    .relativeTop(0.975)
                ], title: "Drake") {
                    //The list of the most popular songs of the artist.
                    ScrollView {
                        ForEach(self.songs, id: \.self) { song in
                            Text(song)
                                .frame(maxWidth: .infinity, alignment: .leading)
                                .padding([.leading, .bottom])
                        }
                    }
                }
                .customAnimation(.linear.speed(0.4))
                .dragIndicatorColor(Color(red: 0.17, green: 0.17, blue: 0.33))
                .customBackground(
                    Color.black
                        .cornerRadius(30)
                        .shadow(color: .white, radius: 10, x: 0, y: 0)
                )
                .foregroundColor(.white)
                // Adding the shadow here does not break the hiding transition, but the shadow may gets added to your other views too
                // .shadow(color: .white, radius: 10, x: 0, y: 0)
        }
    }

    Test project

    A project to test the BottomSheet can be found here. This project is used by me to test new features and to reproduce bugs, but can also be used very well as a demo project.

    Contributing

    BottomSheet welcomes contributions in the form of GitHub issues and pull-requests. Please check the Discussions before opening an issue or pull request.

    License

    BottomSheet is available under the MIT license. See the LICENSE file for more information.

    Credits

    BottomSheet is a project of @lucaszischka.

    Visit original content creator repository https://github.com/lucaszischka/BottomSheet
  • slotgames-web-component

    Built With Stencil

    Stencil Component Starter

    This is a starter project for building a standalone Web Component using Stencil.

    Stencil is also great for building entire apps. For that, use the stencil-app-starter instead.

    Stencil

    Stencil is a compiler for building fast web apps using Web Components.

    Stencil combines the best concepts of the most popular frontend frameworks into a compile-time rather than run-time tool. Stencil takes TypeScript, JSX, a tiny virtual DOM layer, efficient one-way data binding, an asynchronous rendering pipeline (similar to React Fiber), and lazy-loading out of the box, and generates 100% standards-based Web Components that run in any browser supporting the Custom Elements v1 spec.

    Stencil components are just Web Components, so they work in any major framework or with no framework at all.

    Getting Started

    To start building a new web component using Stencil, clone this repo to a new directory:

    git clone https://github.com/ionic-team/stencil-component-starter.git my-component
    cd my-component
    git remote rm origin

    and run:

    npm install
    npm start

    To build the component for production, run:

    npm run build

    To run the unit tests for the components, run:

    npm test

    Need help? Check out our docs here.

    Naming Components

    When creating new component tags, we recommend not using stencil in the component name (ex: <stencil-datepicker>). This is because the generated component has little to nothing to do with Stencil; it’s just a web component!

    Instead, use a prefix that fits your company or any name for a group of related components. For example, all of the Ionic generated web components use the prefix ion.

    Using this component

    Script tag

    • Publish to NPM
    • Put a script tag similar to this <script src='https://unpkg.com/my-component@0.0.1/dist/mycomponent.js'></script> in the head of your index.html
    • Then you can use the element anywhere in your template, JSX, html etc

    Node Modules

    • Run npm install my-component --save
    • Put a script tag similar to this <script src="https://github.com/guiwuff/node_modules/my-component/dist/mycomponent.js"></script> in the head of your index.html
    • Then you can use the element anywhere in your template, JSX, html etc

    In a stencil-starter app

    • Run npm install my-component --save
    • Add an import to the npm packages import my-component;
    • Then you can use the element anywhere in your template, JSX, html etc
    Visit original content creator repository https://github.com/guiwuff/slotgames-web-component
  • ArRTM-Web

    anyrtc RTM Web SDK 是通过 HTML 网页加载的 JavaScript 库。RTM Web SDK 库在网页浏览器中借助实时消息SDK,轻松实现社交沟通、直播聊天室、互动教育等场景。

    导入

    ArRTM 是 anyrtc RTM SDK 的导出模块。

    script 导入

    使用 <script> 标签引入 SDK 时,产生名为 ArRTM 的全局变量,该变量含有该模块的所有成员。

    <script src="https://ardw.anyrtc.io/sdk/web/ArRTM@latest.js"></script>
    

    npm 导入

    import ArRTM from "ar-rtm-sdk";
    

    功能介绍

    请分别调用 RtmClient.onRtmChannel.on 方法添加 RtmClientRtmChannel 对象的监听器。

    anyrtc RTM Web SDK 提供以下功能:

    登录登出相关

    img

    方法 描述
    createInstance 创建一个 RtmClient 实例。
    login 登录 anyrtc RTM 系统。
    logout 退出登录,退出后自动断开连接和销毁回调监听。
    事件 描述
    ConnectionStateChanged 通知 SDK 与 anyrtc RTM 系统的连接状态发生了改变。

    点对点消息

    img

    方法 描述
    sendMessageToPeer 向指定用户(接收者)发送点对点消息或点对点的离线消息。
    事件 描述
    MessageFromPeer 收到来自对端的点对点消息。

    查询用户在线状态

    方法 描述
    queryPeersOnlineStatus 查询指定用户的在线状态。

    订阅或取消订阅单个或多个指定用户的在线状态

    Method Description
    subscribePeersOnlineStatus 订阅指定单个或多个用户的在线状态。
    unsubscribePeersOnlineStatus 取消订阅指定单个或多个用户的在线状态。
    queryPeersBySubscriptionOption 获取某特定内容被订阅的用户列表。
    Event Description
    PeersOnlineStatusChanged 被订阅用户在线状态改变回调。

    用户属性增删改查

    方法 描述
    setLocalUserAttributes 全量设置本地用户的属性。
    addOrUpdateLocalUserAttributes 添加或更新本地用户的属性。
    deleteLocalUserAttributesByKeys 删除本地用户的指定属性。
    clearLocalUserAttributes 清空本地用户的属性。
    getUserAttributes 获取指定用户的全部属性。
    getUserAttributesByKeys 获取指定用户指定属性名的属性。

    频道属性增删改查

    方法 描述
    setChannelAttributes 全量设置某指定频道的属性。
    addOrUpdateChannelAttributes 添加或更新某指定频道的属性。
    deleteChannelAttributesByKeys 删除某指定频道的指定属性。
    clearChannelAttributes 清空某指定频道的属性。
    getChannelAttributes 查询某指定频道的全部属性。
    getChannelAttributesByKeys 查询某指定频道指定属性名的属性。
    频道属性更新事件 描述
    AttributesUpdated 当频道属性更新时返回当前频道的所有属性。

    查询单个或多个频道的成员人数

    方法 描述
    getChannelMemberCount 查询单个或多个频道的成员人数。用户无需加入指定频道即可调用该方法。

    上传或下载文件或图片

    方法 描述
    createMediaMessageByUploading 上传一个文件或图片到 anyrtc 服务器以获取 RtmFileMessage 实例或 RtmImageMessage 实例,可用于发送频道消息和点对点消息。
    createMessage 创建一个消息实例。对于文件消息和图片消息,如果对应的文件或图片已经上传且 media ID 仍然有效,你无需再次上传文件或图片,可以直接调用此方法获取消息实例用来发送点对点消息或频道消息。
    downloadMedia 通过 media ID 从 anyrtc 服务器下载文件或图片。

    加入离开频道相关

    img

    方法 描述
    createChannel 创建一个 RtmChannel 实例。
    join 加入频道。加入频道成功后可收到该频道消息和频道用户进出通知。
    leave 离开频道。不再接收频道消息和频道用户进出通知。
    事件 描述
    MemberJoined 远端用户加入频道回调。
    MemberLeft 远端用户离开频道回调。
    MemberCountUpdated 频道成员人数更新回调。返回最新频道成员人数。

    频道消息

    img

    方法 描述
    sendMessage 供频道成员向所在频道发送频道消息。
    事件 描述
    ChannelMessage 收到频道消息回调。

    获取频道成员列表

    方法 描述
    getMembers 获取频道成员列表。

    呼叫邀请管理

    • 主叫取消已发送的呼叫邀请的 API 时序图:

    img

    • 被叫接收或拒绝收到的呼叫邀请的 API 时序图:

    img

    供主叫调用的方法 描述
    createLocalInvitation 供主叫创建一个 LocalInvitation 实例。
    send 供主叫发送呼叫邀请给对端。
    cancel 供主叫取消已发送的呼叫邀请。
    供被叫调用的方法 描述
    accept 供被叫接受呼叫邀请。
    refuse 供被叫拒绝呼叫邀请。
    返回给主叫的事件 描述
    LocalInvitationReceivedByPeer 返回给主叫的回调:被叫已收到呼叫邀请。
    LocalInvitationCanceled 返回给主叫的回调:呼叫邀请已被取消。
    LocalInvitationAccepted 返回给主叫的回调:被叫已接受呼叫邀请。
    LocalInvitationRefused 返回给主叫的回调:被叫已拒绝呼叫邀请。
    LocalInvitationFailure 返回给主叫的回调:呼叫邀请过程失败。
    返回给被叫的事件 描述
    RemoteInvitationReceived 返回给被叫的回调:收到一条呼叫邀请。
    RemoteInvitationCanceled 返回给被叫的回调:主叫已取消呼叫邀请。
    RemoteInvitationAccepted 返回给被叫的回调:接受呼叫邀请成功。
    RemoteInvitationRefused 返回给被叫的回调:拒绝呼叫邀请成功。
    RemoteInvitationFailure 返回给被叫的回调:呼叫邀请过程失败。

    更新 Token

    方法 描述
    renewToken 更新当前 Token。
    事件 描述
    TokenExpired Token 过期回调。

    日志设置与版本查询

    变量 描述
    enableLogUpload 是否启用日志上传。
    logFilter 设置 SDK 的日志输出等级。
    VERSION anyrtc RTM SDK 的当前版本信息。

    ##定制方法

    方法 描述
    setParameters 配置 SDK 提供技术预览或特别定制功能。
    Visit original content creator repository https://github.com/anyRTC/ArRTM-Web
  • KenyanCounties

    Kenyan Counties

    KenyanCounties is an android library that displays all the 47 counties in Kenya for selection.

    Each county in this library has;

    • Name eg Mombasa
    • ID eg 1
    • County Number eg 001
    • Flag

    Installation

    Add this library to your dependencies

        implementation 'com.martinmbae.kenyan.47counties:library:1.0.3'

    Usage

    Add the following imports to your project

    import studios.luxurious.kenya47counties.activities.CountyReturned;
    import studios.luxurious.kenya47counties.activities.Kenya47Counties;
    import studios.luxurious.kenya47counties.models.County;

    To the display all counties, call the method

       Kenya47Counties.showAllCountiesDialog(MainActivity.this, 
                            "Select your county",
                            true, //Display county number
                            true, //Display County Flags
                            false, //Order alphabetically. When false it will order by county number
                            new CountyReturned() {
                        @Override
                        public void onSelectedCounty(County selectedCounty) {
                            
                            String countyName = selectedCounty.getName(); //eg Nairobi
                            int countyId = selectedCounty.getId();  //eg 47
                            String countyNumber = selectedCounty.getFormattedCountyNumber(); //eg 047 
                            Drawable countyFlag = selectedCounty.getFlag(); 
    
                            String selectionText = countyNumber + " - " + countyName;
                            selectedCountyTextview.setText(selectionText);
                            flagImageView.setImageDrawable(countyFlag);
                        }
                    });

    Screenshots

    Ordered by county number

    Ordered alphabetically

    License

    MIT License

    Copyright (c) 2021 Martin Mbae
    
    Permission is hereby granted, free of charge, to any person obtaining a copy
    of this software and associated documentation files (the "Software"), to deal
    in the Software without restriction, including without limitation the rights
    to use, copy, modify, merge, publish, distribute, sublicense, and/or sell
    copies of the Software, and to permit persons to whom the Software is
    furnished to do so, subject to the following conditions:
    
    The above copyright notice and this permission notice shall be included in all
    copies or substantial portions of the Software.
    
    THE SOFTWARE IS PROVIDED "AS IS", WITHOUT WARRANTY OF ANY KIND, EXPRESS OR
    IMPLIED, INCLUDING BUT NOT LIMITED TO THE WARRANTIES OF MERCHANTABILITY,
    FITNESS FOR A PARTICULAR PURPOSE AND NONINFRINGEMENT. IN NO EVENT SHALL THE
    AUTHORS OR COPYRIGHT HOLDERS BE LIABLE FOR ANY CLAIM, DAMAGES OR OTHER
    LIABILITY, WHETHER IN AN ACTION OF CONTRACT, TORT OR OTHERWISE, ARISING FROM,
    OUT OF OR IN CONNECTION WITH THE SOFTWARE OR THE USE OR OTHER DEALINGS IN THE
    SOFTWARE.
    
    
    Visit original content creator repository https://github.com/MartinMbae/KenyanCounties
  • mtb-example-btsdk-cyw208xx-keyboard-scanner

    AIROC™ CYW208xx Bluetooth® devices: HAL keyboard scanner

    This code example demonstrates the dedicated keyscan hardware, which processes key press events from proprietary GPIOs (LHL GPIOs) without interrupting the CPU core. This code example also demonstrates low power entry when the system is idle (no activity or keypress) and wake up when there is key press. This code example is developed using ModusToolbox™ software integrated development environment.

    Features demonstrated:

    1. Functionality of keyscan with maximum possible buttons (that is, 63 in 7 rows * 9 columns) on CYW9208xxEVB-0X.
    2. Configuring extended power down state (ePDS) low power mode and post wake-up.

    View this README on GitHub.

    Provide feedback on this code example.

    Requirements

    Supported toolchains (make variable ‘TOOLCHAIN’)

    • GNU Arm® embedded compiler v9.3.1 (GCC_ARM) – Default value of TOOLCHAIN

    Supported kits (make variable ‘TARGET’)

    Hardware setup

    This example uses the board’s default configuration. See the kit user guide to ensure that the board is configured correctly. However, some of the default super-muxable functions are remapped to the keyscan hardware block.

    Software setup

    Install a terminal emulator if you don’t have one. Instructions in this document use Tera Term. All other required software comes bundled with the ModusToolbox™ software.

    To use a Windows PC as the Bluetooth® LE Central device for the GATT Client application, install CySmart host emulation tool. You will also need CY5677 CySmart Bluetooth® LE 4.2 USB dongle.

    To use an iOS or Android smartphone as the Bluetooth® LE Central device, download the CySmart app. Scan the following QR codes from your mobile phone to download the CySmart app.

    This example requires no additional software or tools.

    Using the code example

    Create the project and open it using one of the following:

    In Eclipse IDE for ModusToolbox™ software
    1. Click the New Application link in the Quick Panel (or, use File > New > ModusToolbox Application). This launches the Project Creator tool.

    2. Pick a kit supported by the code example from the list shown in the Project Creator – Choose Board Support Package (BSP) dialog.

      When you select a supported kit, the example is reconfigured automatically to work with the kit. To work with a different supported kit later, use the Library Manager to choose the BSP for the supported kit. You can use the Library Manager to select or update the BSP and firmware libraries used in this application. To access the Library Manager, click the link from the Quick Panel.

      You can also just start the application creation process again and select a different kit.

      If you want to use the application for a kit not listed here, you may need to update the source files. If the kit does not have the required resources, the application may not work.

    3. In the Project Creator – Select Application dialog, choose the HAL Keyboard Scanner by enabling the checkbox.

    4. (Optional) Change the suggested New Application Name.

    5. The Application(s) Root Path defaults to the Eclipse workspace which is usually the desired location for the application. If you want to store the application in a different location, you can change the Application(s) Root Path value. Applications that share libraries should be in the same root path.

    6. Click Create to complete the application creation process.

    For more details, see the Eclipse IDE for ModusToolbox™ software user guide (locally available at {ModusToolbox™ software install directory}/ide_{version}/docs/mt_ide_user_guide.pdf).

    In command-line interface (CLI)

    ModusToolbox™ software provides the Project Creator as both a GUI tool and the command line tool, “project-creator-cli”. The CLI tool can be used to create applications from a CLI terminal or from within batch files or shell scripts. This tool is available in the {ModusToolbox™ software install directory}/tools_{version}/project-creator/ directory.

    Use a CLI terminal to invoke the “project-creator-cli” tool. On Windows, use the command line “modus-shell” program provided in the ModusToolbox™ software installation instead of a standard Windows command-line application. This shell provides access to all ModusToolbox™ software tools. You can access it by typing modus-shell in the search box in the Windows menu. In Linux and macOS, you can use any terminal application.

    This tool has the following arguments:

    Argument Description Required/optional
    --board-id Defined in the <id> field of the BSP manifest Required
    --app-id Defined in the <id> field of the CE manifest Required
    --target-dir Specify the directory in which the application is to be created if you prefer not to use the default current working directory Optional
    --user-app-name Specify the name of the application if you prefer to have a name other than the example’s default name Optional

    The following example will clone the “HAL Keyboard Scanner” application with the desired name “MyKeyboardScanner” configured for the CYW920820M2EVB-01 BSP into the specified working directory, C:/mtb_projects:

    project-creator-cli --board-id CYW920820M2EVB-01 --app-id mtb-example-btsdk-cyw208xx-keyboard-scanner --user-app-name MyKeyboardScanner --target-dir "C:/mtb_projects"
    

    Note: The project-creator-cli tool uses the git clone and make getlibs commands to fetch the repository and import the required libraries. For details, see the “Project creator tools” section of the ModusToolbox™ software user guide (locally available at {ModusToolbox™ software install directory}/docs_{version}/mtb_user_guide.pdf).

    In third-party IDEs

    Use one of the following options:

    • Use the standalone Project Creator tool:

      1. Launch Project Creator from the Windows Start menu or from {ModusToolbox™ software install directory}/tools_{version}/project-creator/project-creator.exe.

      2. In the initial Choose Board Support Package screen, select the BSP, and click Next.

      3. In the Select Application screen, select the appropriate IDE from the Target IDE drop-down menu.

      4. Click Create and follow the instructions printed in the bottom pane to import or open the exported project in the respective IDE.


    • Use command-line interface (CLI):

      1. Follow the instructions from the In command-line interface (CLI) section to create the application, and then import the libraries using the make getlibs command.

      2. Export the application to a supported IDE using the make <ide> command.

      3. Follow the instructions displayed in the terminal to create or import the application as an IDE project.

    For a list of supported IDEs and more details, see the “Exporting to IDEs” section of the ModusToolbox™ software user guide (locally available at {ModusToolbox™ software install directory}/docs_{version}/mtb_user_guide.pdf).

    Operation

    1. Connect the board to your PC using the provided USB cable through the USB connector.

      The USB serial interface on the kit provides access to the two UART interfaces of the CYW208xx/CYW207xx device: WICED HCI UART and WICED peripheral.

    2. Open any serial terminal program and select the WICED PUART COM port. Set the serial port parameters to 8N1 and 115200 baud.

    3. Program the board with the mtb-example-btsdk-cyw208xx-keyboard-scanner application.

    Using Eclipse IDE for ModusToolbox™ software
      1. Select the application project in the Project Explorer.
    
      2. In the **Quick Panel**, scroll down, and click **\<Application Name> Program**.
    
    Using CLI
     From the terminal, execute the `make program` command to build and program the application using the default toolchain to the default target. The default toolchain and target are specified in the application's Makefile but you can override those values manually:
      ```
      make program TARGET=<BSP> TOOLCHAIN=<toolchain>
      ```
    
      Example:
      ```
      make program TARGET=CYW920820M2EVB-01 TOOLCHAIN=GCC_ARM
      ```
    
    1. Following instructions appear on the terminal on application start.

      Figure 1. PUART messages

    Design and implementation

    The objective of the application is to demonstrate how you can make use of the keyboard scanner block available in the CYW20xxx Bluetooth® devices. This application also exhibits the procedure to configure ePDS low power mode when the keyscan block is inactive. This application uses custom board support package (BSP/design.modus) as it overrides the default LHL GPIO pin configurations with the help of super-mux functionality. See the datasheet for more details on super-mux functionality. The application also uses a 100 millisecond timer to track the key pressed time.

    The following LHL GPIO pins are configured as keyscan rows and columns:

    Table 1. Mapped rows to GPIO’s

    ROW Mapped Px#
    0 P0
    1 P1
    2 P2
    3 P3
    4 P4
    5 P5
    6 P6

    Table 2. Mapped columns to GPIO’s

    COL Mapped Px#
    0 P8
    1 P9
    2 P10
    3 P11
    4 P12
    5 P13
    6 P14
    7 P15
    8 P17

    This section explains the ModusToolbox™ software resources and their configuration as used in this code example. Note that all the configuration explained in this section has already been done in the code example. Eclipse IDE for ModusToolbox™ software stores the configuration settings of the application in the design.modus file. This file is used by the graphical configurators, which generate the configuration firmware. This firmware is stored in the application’s GeneratedSource folder.


    Related resources

    Resources Links
    Application notes AN225684 – Getting started with CYW208xx
    Code examples Using ModusToolbox™ software on GitHub
    Using Bluetooth® SDK
    Device documentation CYW20819 device datasheet
    CYW20820 device datasheet
    Development kits Visit https://www.infineon.com/cms/en/product/wireless-connectivity/airoc-bluetooth-le-bluetooth-multiprotocol/
    Libraries on GitHub btsdk-drivers – Bluetooth® SDK drivers library
    btsdk-mesh – Bluetooth® LE mesh libraries
    btsdk-ota – Bluetooth® LE OTA libraries
    btsdk-ble – Bluetooth® LE profile libraries
    Tools Eclipse IDE for ModusToolbox™ software – ModusToolbox™ software is a collection of easy-to-use software and tools enabling rapid development with Infineon MCUs, covering applications from embedded sense and control to wireless and cloud-connected systems using AIROC™ Wi-Fi and Bluetooth® connectivity devices.
    btsdk-utils – Bluetooth® SDK utilities
    btsdk-peer-apps-ota – Bluetooth® LE OTA peer applications
    btsdk-host-peer-apps – Bluetooth® LE mesh host and peer applications
    btsdk-host-apps-bt-ble – Bluetooth® and Bluetooth® LE host applications

    Other resources

    Infineon provides a wealth of data at www.infineon.com to help you select the right device, and quickly and effectively integrate it into your design.

    Document history

    Document title: CE229928 – AIROC™ CYW208xx Bluetooth® devices: HAL keyboard scanner

    Version Description of change
    1.0.0 New code example
    1.1.0 Folders restructured
    2.0.0 Updated for ModusToolbox™ software v2.4
    This version is not backward compatible with ModusToolbox™ software v2.1
    Added CYW920820M2EVB-01 platform support


    © Cypress Semiconductor Corporation, 2019-2021. This document is the property of Cypress Semiconductor Corporation, an Infineon Technologies company, and its affiliates (“Cypress”). This document, including any software or firmware included or referenced in this document (“Software”), is owned by Cypress under the intellectual property laws and treaties of the United States and other countries worldwide. Cypress reserves all rights under such laws and treaties and does not, except as specifically stated in this paragraph, grant any license under its patents, copyrights, trademarks, or other intellectual property rights. If the Software is not accompanied by a license agreement and you do not otherwise have a written agreement with Cypress governing the use of the Software, then Cypress hereby grants you a personal, non-exclusive, nontransferable license (without the right to sublicense) (1) under its copyright rights in the Software (a) for Software provided in source code form, to modify and reproduce the Software solely for use with Cypress hardware products, only internally within your organization, and (b) to distribute the Software in binary code form externally to end users (either directly or indirectly through resellers and distributors), solely for use on Cypress hardware product units, and (2) under those claims of Cypress’s patents that are infringed by the Software (as provided by Cypress, unmodified) to make, use, distribute, and import the Software solely for use with Cypress hardware products. Any other use, reproduction, modification, translation, or compilation of the Software is prohibited.
    TO THE EXTENT PERMITTED BY APPLICABLE LAW, CYPRESS MAKES NO WARRANTY OF ANY KIND, EXPRESS OR IMPLIED, WITH REGARD TO THIS DOCUMENT OR ANY SOFTWARE OR ACCOMPANYING HARDWARE, INCLUDING, BUT NOT LIMITED TO, THE IMPLIED WARRANTIES OF MERCHANTABILITY AND FITNESS FOR A PARTICULAR PURPOSE. No computing device can be absolutely secure. Therefore, despite security measures implemented in Cypress hardware or software products, Cypress shall have no liability arising out of any security breach, such as unauthorized access to or use of a Cypress product. CYPRESS DOES NOT REPRESENT, WARRANT, OR GUARANTEE THAT CYPRESS PRODUCTS, OR SYSTEMS CREATED USING CYPRESS PRODUCTS, WILL BE FREE FROM CORRUPTION, ATTACK, VIRUSES, INTERFERENCE, HACKING, DATA LOSS OR THEFT, OR OTHER SECURITY INTRUSION (collectively, “Security Breach”). Cypress disclaims any liability relating to any Security Breach, and you shall and hereby do release Cypress from any claim, damage, or other liability arising from any Security Breach. In addition, the products described in these materials may contain design defects or errors known as errata which may cause the product to deviate from published specifications. To the extent permitted by applicable law, Cypress reserves the right to make changes to this document without further notice. Cypress does not assume any liability arising out of the application or use of any product or circuit described in this document. Any information provided in this document, including any sample design information or programming code, is provided only for reference purposes. It is the responsibility of the user of this document to properly design, program, and test the functionality and safety of any application made of this information and any resulting product. “High-Risk Device” means any device or system whose failure could cause personal injury, death, or property damage. Examples of High-Risk Devices are weapons, nuclear installations, surgical implants, and other medical devices. “Critical Component” means any component of a High-Risk Device whose failure to perform can be reasonably expected to cause, directly or indirectly, the failure of the High-Risk Device, or to affect its safety or effectiveness. Cypress is not liable, in whole or in part, and you shall and hereby do release Cypress from any claim, damage, or other liability arising from any use of a Cypress product as a Critical Component in a High-Risk Device. You shall indemnify and hold Cypress, including its affiliates, and its directors, officers, employees, agents, distributors, and assigns harmless from and against all claims, costs, damages, and expenses, arising out of any claim, including claims for product liability, personal injury or death, or property damage arising from any use of a Cypress product as a Critical Component in a High-Risk Device. Cypress products are not intended or authorized for use as a Critical Component in any High-Risk Device except to the limited extent that (i) Cypress’s published data sheet for the product explicitly states Cypress has qualified the product for use in a specific High-Risk Device, or (ii) Cypress has given you advance written authorization to use the product as a Critical Component in the specific High-Risk Device and you have signed a separate indemnification agreement.
    Cypress, the Cypress logo, and combinations thereof, WICED, ModusToolbox, PSoC, CapSense, EZ-USB, F-RAM, and Traveo are trademarks or registered trademarks of Cypress or a subsidiary of Cypress in the United States or in other countries. For a more complete list of Cypress trademarks, visit cypress.com. Other names and brands may be claimed as property of their respective owners.

    Visit original content creator repository https://github.com/Infineon/mtb-example-btsdk-cyw208xx-keyboard-scanner
  • EntityDetection

    Entity Detection Icon EntityDetection

    EntityDetection is a Paper plugin with which you can quickly find chunks with a large amount of Monsters, Animals or even Tile Entities like Hoppers in it.

    Very useful if you want to find XP-Farms that accumulate a large amount of mobs or that one infinite chicken or villager breeder that brings your server to its knees!

    Command Output

    Installation

    1. Download the latest version of the EntityDetection plugin:
      1. Modrinth
      2. Hangar
      3. Dev Builds
    2. Place the downloaded .jar file into the plugins directory of your Paper server.
    3. Restart the server to enable the plugin.

    Dependencies

    This plugin does not require any other plugin to run, but it requires Paper to be used as the server software and can optionally integrate with WorldGuard for region-based entity detection.

    Usage

    Commands

    • /detect search [monster|passive|misc|block|tile|entity|all|<type>]

      • The main plugin command. Start a search for chunks with lots of entities in it. Without any type it searches for Monsters but you can also search for a specific type of entities (take a look at the different types below) or for single entity types. With version 1.1 you can also search for Hopper and other blockstates! You can also combine different types by just inputting them after each other separated by a space. When the search is finished you will get a list for all chunks sorted by their entity count.
    • /detect search --regions [<type>]

      • List results based on WorldGuard regions instead of chunks
    • /detect list [<page> [monster|passive|misc|block|tile|all|<type>]]

      • List more pages of a previous search result. You can specify a type to see the last search of a specific type.
    • /detect stop

      • Stops the currently running search.
    • /detect tp <#result>

      • Teleport to a specific entry number from a search. (You can also directly click on the entry line to teleport to it!)

    Search Types:

    Monster

    All the monsters and slimes

    Passive

    All the animals, NPCs and golems as well as ambient and water mobs

    Misc

    Everything that is not a real mob: fireworks, boats, minecarts, projectiles, dropped items, ender signals and lightning strikes.

    Block (More like pseudo-block but that’s too long)

    Entities that behave more like blocks than entities: armor stands, ender crystals, paintings, item frames and falling blocks.

    Entity

    Search for all the entities, no matter what type they are

    Tile

    Search for all tile entities, no matter what type they are

    All

    Search for everything entities and tile entities/blockstates, no matter what type they are

    The categories aren’t enough? Then you can search for specific tile entities directly! This is done by either inputting the class name of their block state (which is case sensitive) or the Material name!

    You can also search for the specific Bukkit entity type! Every single one is supported and can be combined with the other search types.

    If you have ideas how one of the types could be improved or for a new one just respond to the discussion thread or directly submit a pull request for a modification of the SearchType enum!

    Examples

    • To search for all monsters: /detect search monster
    • To list the results of the last search: /detect list
    • To teleport to the first result: /detect tp 1

    Permissions

    • entitydetection.command
      • Allows the player to use the /detect command.
      • Default: op
    • entitydetection.command.search
      • Allows the player to use the /detect search command.
      • Default: op
    • entitydetection.command.list
      • Allows the player to use the /detect list command.
      • Default: op
    • entitydetection.command.stop
      • Allows the player to use the /detect stop command.
      • Default: op
    • entitydetection.command.tp
      • Allows the player to use the /detect tp command.
      • Default: op

    Configuration

    The plugin supports multiple languages. You can set the default language via the de.themoep.entitydetection.default-language system property and create your own language files in the languages folder. The default language is English (en).

    Contributing

    Contributions are welcome! If you find any bugs or have feature requests, please open an issue on the GitHub repository.

    License

    This project is licensed under the Mozilla Public License version 2.0. See the LICENSE file for details.

    Visit original content creator repository https://github.com/Minebench/EntityDetection