
A lightweight tool that reminds user to take break after a certain time period.

CatSleep image source: personalitycafe
catsleep is a tool for people working long hours in computer specially, programmers, software engineers and other IT professionals. Sometimes, we are so much engaged in a task that we forget to take break or have a walk that would be very harmfull to our both mental and physical health. So, we initiated this tiny effort for making a tool that would remind the person/user after a certain time to take a break, a refreshment so that s/he can concentrate to their work with a fresh mind and it would help them to keep their mental and physical health sound.
- Install using the following command-
git clone https://github.com/faruk-ahmad/catsleep
cd catsleep
bash install.sh- Restart your computer to get it worked.
- Uninstall catsleep tool using the following command
cd /home/<user>/catsleep
bash uninstall.sh- Provide “y” if you are prompt for approval to remove some config files.
- Restart your computer to finish the uninstallation process.
git clone https://github.com/faruk-ahmad/catsleep
# you can run the catsleep/main.py file to run the application
# installer not available yetgit clone https://github.com/faruk-ahmad/catsleep
# you can run the catsleep/main.py file to run the application
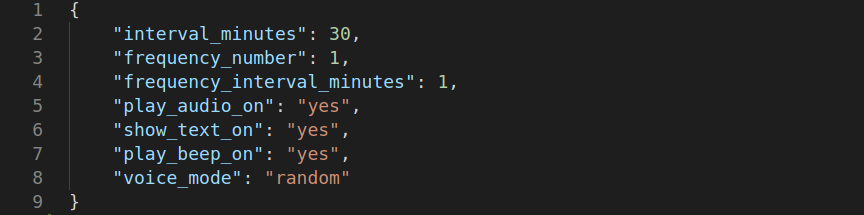
# installer not available yetThe user configuration file resides in the user home directory if you are using linux based OS like ubuntu. It is a hidden file and named as .catsleep_config.json
If you want to change any default behavior like, the interval in between alarms/notifications or want to switch the voice, then you need to edit this configuration file.
Open this file with any text editor and it looks like-

The parameters in the configuration are as follows
| Parameter | Explanation | Possible Values | Effect |
|---|---|---|---|
| interval_minutes | Interval in between alarms/notifications, integer value given as minutes | 1 to infininte | change the interval in alarms/notification |
| frequency_number | Number of consecutive alarms/notifications in a slot | 1 to infinite | Make multiple consecutive alarms at each alarm |
| frequency_interval_minutes | Gap in minutes in between consecutive alarms at a time | 1 <= value < interval | make multiple alarms after this given time |
| play_audio_on | Trigger On/Off audio message as alarm | “yes” for on, “no” for off | will turn on/off audio message in notification |
| show_text_on | Trigger On/Off text notification as alarm | “yes” for on, “no” for off | will turn on/off text bubble in notification |
| play_beep_on | Trigger On/Off beep sound as alarm | “yes” for on, “no” for off | will turn on/off beep sound in notification |
| voice_mode | Switch in between male and female voice mode | “male”, “female”, “random” | will change the audio message mode |
- The notification or alarm works good with all the three [beep, audio & text] on.
See more detail configuration in Example doc
- Notification to take break in works
- Customization in interval, alarm frequency
- Audio message, mode switching
- User can customize audio messages, text messages and beep sounds
- Multiple different interval in between alarms
- Extract task list from linked calender by user and set alarms base on tasks
Before you report an issue in github, please make sure you are in the same pace with the up to date commit in our github repo.
You can contribute in the one or either way of the following-
-- You can report a bug by adding issue in github
-- Or you can contribute by sharing how you solved and issue
-- If you came accross any new idea that can be added as feature
-- If you come with new idea of a feature and add it
-- Send us pull request
-- Adding some new cool audio file for notification
-- Adding some amazing text message for notification
-- Adding some amazing beep sound for notification
 https://github.com/faruk-ahmad/catsleep